Using Microsoft Azure SQL Edge as DBMS on macOS
It is possible to use Microsoft Azure SQL Edge as an alternative to manage the database. This section briefly describes the additional requirements and the steps that deviate from the ones described in the Manual installation section.
Additional Requirements
The following additional tools and applications are necessary:
Install Database Management System (Azure SQL Edge)
- With Homebrew tap the MS SQL release formulae.
- Run a command like:
brew tap microsoft/mssql-release https://github.com/Microsoft/homebrew-mssql-release - Further details are available on their GitHub page.
- Run a command like:
- Install relevant ODBC drivers and tools through Homebrew.
- Run a command like:
brew install msodbcsql18 mssql-tools - Further details are available on Microsoft's documentation page.
- Run a command like:
- Download and install Docker Desktop.
- Docker has to be running for the remainder of the installation and when using ADOxx.
- Pull the Docker container with the database management system
- Run a command like:
sudo docker pull mcr.microsoft.com/azure-sql-edge:latest - For additional details about the container (requirements, license etc.) check the container's Docker Hub page.
- Run a command like:
- Add and run the Docker container with the database management system.
- Run a command like:
sudo docker run --cap-add SYS_PTRACE -e 'ACCEPT_EULA=1' -e 'MSSQL_SA_PASSWORD=12+*ADOxx*+34' -p 1433:1433 --name ADOXX_AZURESQL --restart unless-stopped -d mcr.microsoft.com/azure-sql-edge:latest - Wait a bit for the container to start properly. The Docker container has to be running for the remainder of the installation and when using ADOxx.
- Run a command like:
- Add the ODBC connector to make the database accessible via ODBC.
- The
odbcinsttool can be used to achieve this task. - Adapt the command as necessary:
odbcinst -i -s adoxx18s -f odbctemplate.ini - The
odbctemplate.inifile should contain something like:ini[adoxx18s] Driver=ODBC Driver 18 for SQL Server Server=127.0.0.1 Database=adoxx18s AutoTranslate=no TrustServerCertificate=yes - Further details are available in Microsoft's documentation.
- The
- Create the database user and the database in the container.
- The
sqlcmdtool can be used to achieve both tasks. - Adapt the command as necessary:
sqlcmd -C -S 127.0.0.1 -U SA -P '12+*ADOxx*+34' -i createDB.sql - The
createDB.sqlfile should contain something like:sqlCREATE LOGIN ADOxx WITH PASSWORD='DefaultPw$4BOCdb'; GO CREATE DATABASE adoxx18s ON (NAME = 'adoxx18s', FILENAME = '/opt/mssql/adoxx_data/adoxx18s_datf', SIZE = 30MB, MAXSIZE = UNLIMITED, FILEGROWTH = 10%) LOG ON (NAME = 'adoxx18s_log', FILENAME = '/opt/mssql/adoxx_data/adoxx18s_log.ldf', SIZE = 5MB, MAXSIZE = 200MB, FILEGROWTH = 10%); GO USE adoxx18s; GO EXEC sp_grantdbaccess 'ADOxx'; GO GRANT create table,create view TO ADOxx GO
- The
Set Up Database (Azure SQL Edge)
Here perform the same steps as in the Manual installation, with a difference for step 3:
- Run ...
- Run ...
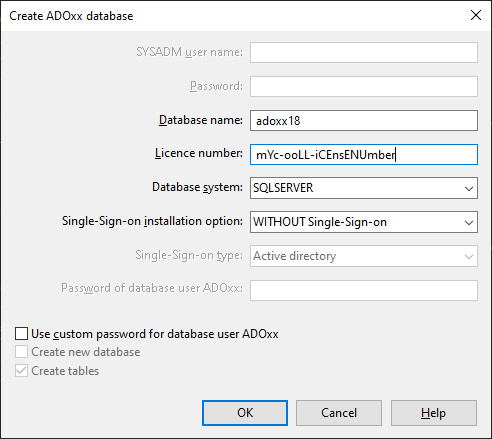
- In the dialog specify:
- the "Database name", which should be the name of the ODBC connector, e.g.
adoxx18s, - the "License number",
- select "SQLSERVER" as the "Database system",
- select "WITHOUT Single-Sign-on" for "Single-Sign-on installation option",
- leave "Use custom password for database user ADOxx" unchecked

- the "Database name", which should be the name of the ODBC connector, e.g.
- Click "OK".
Create Shortcuts (Azure SQL Edge)
Adapt the available shortcuts for the tools to use the correct database and DBMS (SQLSERVER instead of SQLITE).