ADOxx Browser
This page covers various details about the ADOxx Browser, a table-like user interface element.
ADOxx Browser Basics
The ADOxx Browser provides a standard layout for information in a tabular form (table view) with buttons close by to perform various actions, like printing or saving. It is used to realize the representation of most tables throughout ADOxx. The following image shows an example for the tabular model editor from the Modelling Toolkit:
Structure
The general structure of an ADOxx Browser is:
- Row: Contains one set of data, which consists of one or more cells. For example used to represent objects, results etc.
- Column: Structures the data from the rows into separate cells, grouping the meaning of cells. For example used to represent attributes, result qualifiers etc.
- Cell: Shows the data of a row for a specific column. As such it is the intersection of a row with a column. For example a specific attribute value, value of a result etc.
- Column heading: Contains a label for the data in the respective column. For example the name of an attribute or label of a result qualifier. They are located in the first row and have a grey background.
- Row handle: Contains a label for each set of data (row). They are located in the first column and have a grey background.
Simplified an ADOxx Browser is a list of rows. An entire row can be selected by clicking the row handle.
The currently active cell or selected area is indicated by a bold frame. Basic actions like copy and paste are typically available for the selected cells.
If an ADOxx Browser shows elements of different types in its rows, like objects of different classes, then attributes of these classes are shown in one column only if both the attribute name and the attribute type are identical. For example the text attributes "Description" of different classes are shown in the same column while an integer attribute "Quantity" and a floating-point attribute "Quantity" would be displayed in two different columns.
Classification
Different types of ADOxx Browsers are available, according to the following characteristics:
- Editable or non-editable: Characterizing the accessibility of data. The data in an editable ADOxx Browser can be edited, while the data in a non-editable browser only serves for showing results of various kinds.
- Hierarchical or non-hierarchical: Characterizing the visible data structure. The rows in a hierarchical browser are organized as a tree structure with different hierarchy levels, while rows in a non-hierarchical browser are organized in a plain list structure.
Every ADOxx Browser is a combination of these classification characteristics. This results in four different combinations:
- (Basic) ADOxx Browser, like showing simple results from a path simulation.
- Editable ADOxx Browser, like the tabular model editor.
- Hierarchical ADOxx Browser, like showing complex results from from a capacity analysis simulation.
- Editable hierarchical ADOxx Browser, like results from a query which are grouped by model.
Editable ADOxx Browser
An editable ADOxx Browsers allows to edit the values in the cells. The availability of this function depends both on the data and the write access state to the data. For example, you can edit the values in the tabular model editor, if you have previously opened the models with write access. Write-protected attributes are shown in grey.
The editing of the displayed value in an editable ADOxx Browser is possible by:
- directly entering a value in any cell,
- copying and pasting values inside the browser,
- pasting values which have been copied onto the clipboard, for instance from a table calculation program.
For simple attribute values (numbers, text) simply click the cell or select the cell using the cursor keys, type in the new content and confirm with the Enter key. Complex attributes (enumerations, expressions, texts allowing line breaks etc.) use a dialog according to their type and configuration (see Attribute Representation in Notebooks). In this case, double-click the cell or select the cell and select the Enter key to open the dialog. A value can also be edited by selecting Edit attribute from the context menu of a cell or selecting F2 while the cell is selected.
To edit several values in the same column hold down the Shift key, select the desired cells from top to bottom and select Enter to start editing one value after the other in a pop-up dialog. Closing the dialog with Cancel or through Esc will abort editing any further values.
Additionally, it is also possible to paste cell values from another application like Microsoft Excel. Note that only values that fit into the type of the target cell will be pasted, either because they are the same type or can be converted. For example pasting numbers into a cell for text works (converts number to text), but pasting words into cells for numbers will not work.
Hierarchical ADOxx Browser
A hierarchical ADOxx Browser shows the rows in a tree structure according to some relation between the rows rows, like objects belonging to a specific model or for simulation results where a process has several activities that were executed by different performers in the simulation as shown in the following example:
There can be multiple levels in the hierarchy. A number indicating the hierarchy level is shown as part of the row handle. Furthermore, each level can be shrunken or expanded by clicking the ![]() and
and ![]() icons that are part of the row handle.
icons that are part of the row handle.
Due to the hierarchical representation the ADOxx Browser will also show empty cells.
Common Actions
In addition to the common actions that can be used throughout ADOxx the following actions are often accessible through buttons close to the ADOxx Browser or through its context menu:
| Icon | Name | Action |
|---|---|---|
| Notebook | Opens the Notebook for an object. Can also be accessed by holding down Shift + Ctrl + Alt and double-clicking. | |
| Save | Saves the currently displayed contents in a file. Hidden rows and columns are NOT saved. For details see Save section. | |
| Prints the currently displayed contents through an available printer. Hidden rows and columns are NOT printed. | ||
| Search (Ctrl + f) | Searches the currently displayed content for a specific text and selects all rows where it occurs. For details see Item Search section. | |
| Copy to clipboard | Copies the currently displayed contents to the clipboard. Hidden rows and columns are NOT copied. This differs from the normal Copy which only copies the current selection. | |
| Column width | Define the width of the selected column. The width is specified in so-called "norm signs", which define the number of characters that will be visible using the standard font. | |
| Adjust width of columns | Adjusts the width of all columns to the optimal width for showing their content. | |
| Row height | Define the height of the selected rows. The height is specified as the number of lines that should be visible. | |
| Adjust height of row | Adjusts the height of a single row to the optimal height for showing their content. | |
| Adjust all row heights | Adjusts the height of all rows to the optimal height for showing their content. |
The context menu for an ADOxx Browser can be accessed through the white area where the cells are located.
Save
The save action allows to store the displayed results in a file, ignoring any hidden rows and columns. Various options are provided in a separate pop-up dialog: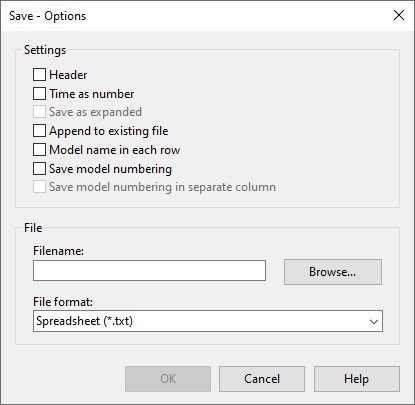
The available options depend on the results being displayed, so not all options are always available. Activating the settings changes various details about the saved file:
- Header: A header is added to the top of the save file, which contains general information like the date and time when the contents have been saved.
- Time as number: Values of type ADOxx time format (YY:DDD:HH:MM:SS) will be converted to seconds in the file.
- Save as expanded: Saves the contents of a hierarchical ADOxx Browser as if all rows of the hierarchy were visible (expanded).
- Append: The contents of the browser are appended to the bottom of an already existing file.
- Model name in each row: The name of the model in question is placed at the beginning of every single row/line of the output file.
- Save model numbering: Also saves the model numbering (number indicating the hierarchy level as part of the row handle).
- Save model numbering in separate column: Saves the model numbering in a separate column.
By clicking on the File format list, you can select the type of file in which the ADOxx Browser content should be saved. The following formats are available:
- Spreadsheet (*.txt): As simple text, but allows to specify user-defined cell separators through a pop-up dialog to enable the resulting file to be easily used in a spreadsheet application.
- Spreadsheet (*.csv): In CSV format without losses which can be opened and edited in a spreadsheet application. Line breaks which may appear in the cells will be correctly interpreted.
- Word processor (*.txt): As pure text, where each row is represented by a line.
- Rich Text Format (*.rtf): In RTF format which can be opened and edited in a word processing application.
- HTML file (*.htm, *.html): In HTML format which can be viewed in a browser. Creates two files: one
.htmfile with the content and one.cssfile with the styling for the content. - Comparing representation (*.acr): In ADOxx Comparable Representation (ACR) format.
Details on Spreadsheet (*.txt) format
The Sentence separator identifies what character is used to indicate the end of a single row. The Field separator is used to indicate an appropriate character to separate the cells of a row.
In case the separator characters are already used within the data, a Substitution character must also be defined which will be used to replace any separator characters that already exist.
Use the Spreadsheet (*.csv) format instead to guarantee that also the cells containing line breaks will be saved correctly.
For example when saving the following ADOxx Browser as a CSV file:
with the options Save model numbering activated creates:
"";"Execution time"
"1. Refusal";""
"File Application";"00:000:00:05:00"
"Inform Applicant";"00:000:00:01:30"
while activating the options Time as number, Model name in each row and Save model numbering creates:
"";"";"Execution Time"
"1. Refusal";"";""
"1. Refusal";"File Application";"300,000000"
"1. Refusal";"Inform Applicant";"90,000000"
Adjust Row / Column Sizes
One approach to adapt the height of rows and width of columns is to use the available options in the context menu of the ADOxx Browser (described in common actions). The height of rows and width of columns can also be adjusted by dragging their division lines with the mouse to the desired size:
A single column can also be set to its optimal width by double-clicking the heading of the column. The optimal width being wide enough to show the longest value of the column or 80 characters, which ever is lower. The width of a column can be manually set to show up to 200 characters.
Select Attributes / Columns
It is possible to show or hide specific columns in some types of ADOxx Browsers. This option is available through the context menu of a cell either as Select attributes or Select columns. Both show a similar pop-up dialog, the following one being an example for Select attributes: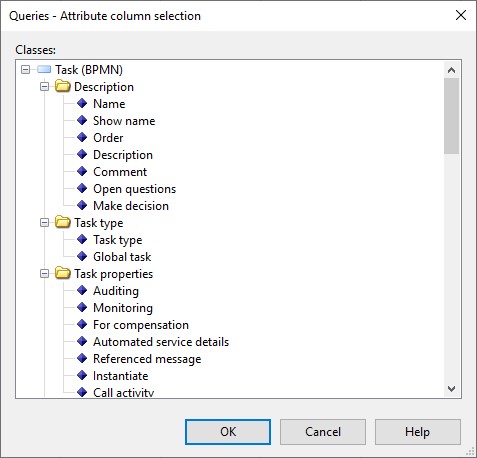
The major difference between the two dialogs is that Select columns presents a flat list, while Select attributes displays the possible options following the notebook structure. Furthermore, editable attributes are depicted with the ![]() icon, while write-protected attributes are depicted with the
icon, while write-protected attributes are depicted with the ![]() icon.
icon.
Sort
The rows can be sorted according to the values displayed in a specific column in some ADOxx Browsers.
The simplest approach to sort the rows is to open the context menu for the column heading and select Sort in ascending order or Sort in descending order. Alternatively open the context menu of the ADOxx Browser and select Sort. This opens a new pop-up dialog where one of the visible columns can be selected and the order (ascending / descending) controlled through a checkbox at the bottom.
It is only possible to sort with columns being displayed in the ADOxx Browser. If you want to sort using a column currently not displayed you will have to include the column beforehand.
Show as Diagram
The ![]() Diagram action (sometimes called Create Diagram) allows to create a diagram based on the content of some ADOxx Browsers. It first opens a dialog where the details can be configured:
Diagram action (sometimes called Create Diagram) allows to create a diagram based on the content of some ADOxx Browsers. It first opens a dialog where the details can be configured: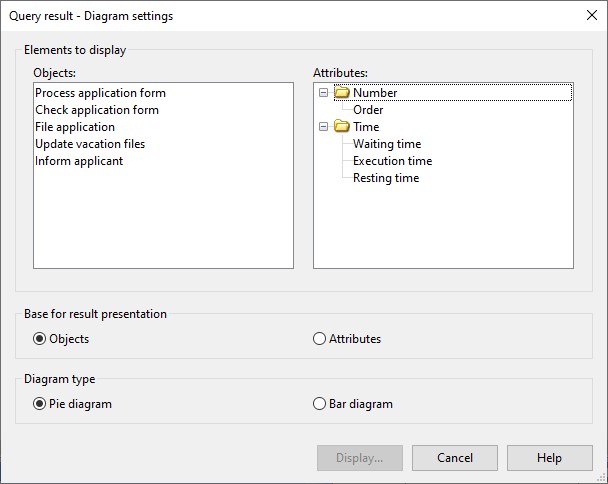
The details configure:
- Objects: Select the objects to be part of the diagram. Only objects that are also visible as rows in the ADOxx Browser are shown in this list.
- Attributes: Select the attributes to be part of the diagram. These are used to calculate the values for the different types of diagrams and must be time or number values. Only attributes that are also visible as columns in the ADOxx Browser are shown in this list.
- Base for result presentation: The Objects option shows the selected attribute per object. The Attributes option gives the selected objects per attribute.
- Diagram type: Specifies whether to display the results in a pie chart or a bar diagram. Only one attribute can be selected when using a pie chart.
Alternative diagram dialog
In some cases an alternative dialog for creating the diagram is shown, like for results of a capacity analysis simulation. 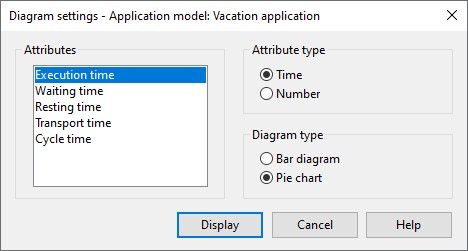
The options here are very similar to the ones described above, with the key differences being:
- You only select the Attributes, but not the objects.
- The attributes to select from are controlled through the Attribute type option.
- The Base for result presentation is always Objects.
Display
Selecting Display will show the resulting diagram in a new dialog. The following two images show an example for a pie chart and a bar diagram: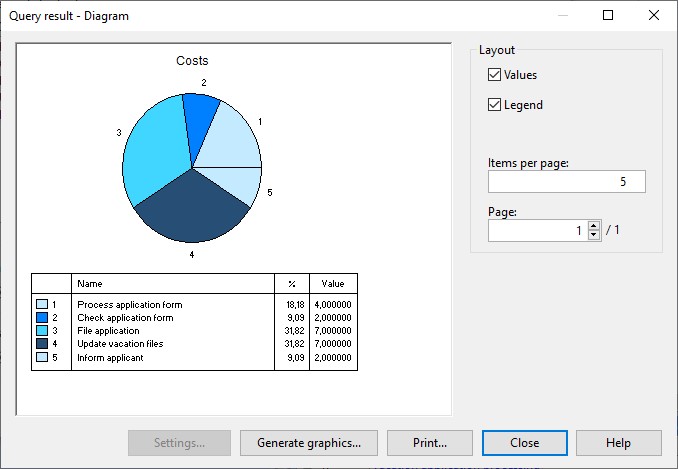
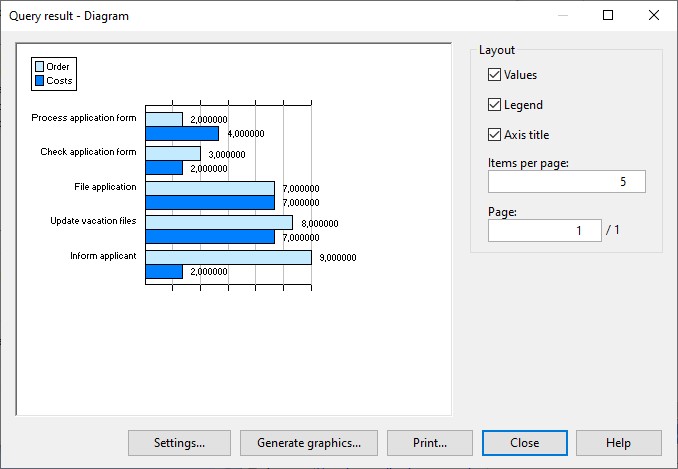
Options on the right side allow to control some of the displayed information, like:
- Displaying the Values as part of the diagram.
- Showing a Legend with the diagram.
- Providing an Axis title.
- The number of Items per page to be shown.
- Which Page to display.
The Settings button at the bottom left of a bar diagram provides additional options to configure the bar diagram display. The button Generate graphics allows you to copy the displayed diagram to the clipboard or to store it as an image file.
Representation of Values
Simple values in a ADOxx Browser are shown as text whereas the representation of more complex types is as follows:
| Type | Representation |
|---|---|
| Record | A record is represented either by the word [Table] or in a hierarchical ADOxx Browser through a |
| Program call | Depends on the definition in the Application Library, showing either -> [...] when it is directly executable (double-clicking executes) or the value of the parameter (double-clicking opens dialog to edit attribute). |
| Reference | References to objects or models provide the relevant information to identify them (object name, class name, model name and model type). These are also hyper-links to the respective object / model that can be followed by clicking them. When multiple references are specified, then they are separated by a line break. To edit references either double-click on the cell outside the hyper-link or open the context menu for the cell and select Edit attribute. |
| Enumeration list | The enumeration values are displayed as text entries separated by a semicolon ;. |
| Calendar | Are not displayed in an ADOxx Browser. |