Messages
This page describes some parts of the built-in messaging system of ADOxx.
Messages Basics
Deprecated
Sending of messages is only available in the same database. However, in a typical deployment of ADOxx or an ADOxx based modelling tool there is a separate database per installation / user. Two cases where the messaging system cab be useful are: 1) writing messages to oneself as reminders and 2) writing messages from inside the implementation of custom functionalities.
The ADOxx messaging system allows you to exchange e-mail-like messages with other ADOxx users from the same database and to manage these messages. It is handled through its own dockable window, which can be opened and closed either through the Window -> Tools -> Messages menu item or selecting Shift + Ctrl + m.

When the message window is opened it automatically checks for messages.
Structure
The upper part of the message window shows a list of all available messages. The icon in the column State shows whether the message is unread (coloured) or read (grey). The column Date" shows date and time when the message was sent and Sender the ADOxx user name of the message's sender. The last column Subject shows the subject of the message.
If a message is selected in the list, then the lower part of the window shows a preview of the message. You can adjust the separator between the two parts as you like.
Common Actions
The ADOxx messaging system provides the following actions through buttons close to the message window or through its context menu:
| Icon | Name | Action |
|---|---|---|
| Check for new messages | Check for new messages. | |
| Create a new message | Write a new message. | |
| Open message | Open a message. Available through the context menu, by double-clicking on a message or selecting a message and selecting Enter. | |
| Reply on message | Reply to the selected message. | |
| Forward message | Forward the selected message. | |
| Delete message | Deletes the selected messages. | |
| Settings | Open the message settings window. |
Getting New Messages
ADOxx messages are downloaded under three different conditions:
- On opening the message window.
- With the appropriate settings ADOxx checks for new messages in regular intervals.
- You can check manually for new messages:
- Click
 Check for new messages icon.
 - Open the context menu of the message window and choose Get new messages.
- Select F5 while the message window is selected.
- Click
Create a New Message
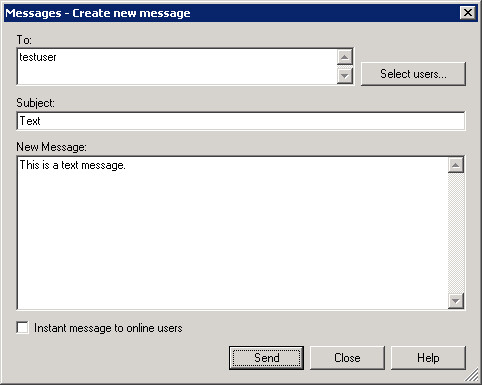
Creating a new message opens a new dialog:
There you have to:
- Enter the ADOxx users of the recipient(s) in the To field separated by line breaks. Click Select users to show a new pop-up dialog to help selecting the users.
- Enter the subject of the message into the field Subject. The subject will be shown in the message window.
- Enter the message text into the field New message.
- Activate Instant message to online users if the message shall be delivered directly. That means that the whole message pops up on the recipient's screen - not only a notifier.
- Confirm with Send
Reply on Message
In order to reply on an open message immediately click the button Reply in the message. To write a reply to a message from the message window either select the message and click ![]() Reply on message, open the context menu of the message and choose Reply or mark the message and select r.
Reply on message, open the context menu of the message and choose Reply or mark the message and select r.
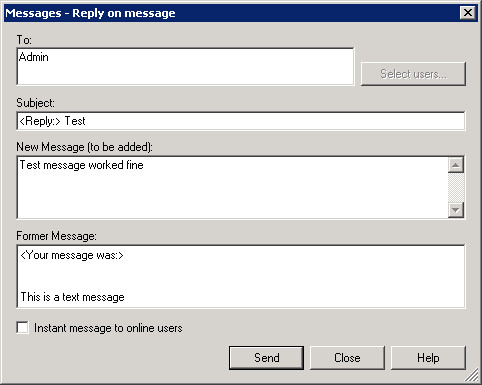
The reply form appears:
The field To is set to the name of the original sender, the field Subject contains the original subject text preceded with <Reply:> and the field Former message contains the text of the original message indicated by <Your message was:>.
- Enter your reply into the field New message.
- Change the Subject if you want.
- Activate Instant message to online users if the message shall be delivered directly.
- Confirm with Send
Forward Message
In order to forward an open message immediately click the button Forward in the message. To forward a message from the message window either select the message and click ![]() Forward message, open the context menu of the message and choose Forward or mark the message and select f.
Forward message, open the context menu of the message and choose Forward or mark the message and select f.
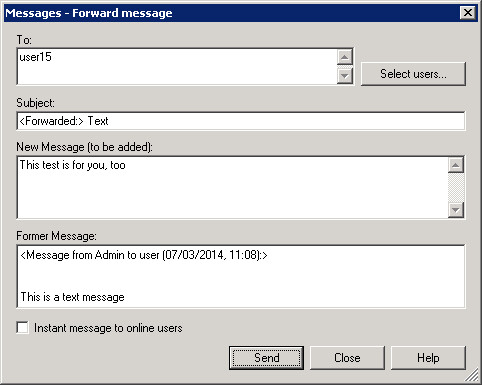
The forwarding form appears:
The field Subject contains the original subject text preceded with <Forwarded:> and the field Former message contains the text of the original message indicated by <Message from [user name] to [user name] ([date], [time]):>.
- Enter the ADOxx users of the recipient(s) in the To field separated by line breaks. Click Select users to show a new pop-up dialog to help selecting the users.
- Enter your reply into the field New message.
- Change the Subject if you want.
- Activate Instant message to online users if the message shall be delivered directly.
- Confirm with Send
Messages Settings
The ADOxx messaging system can be configured with various settings to different personal needs. For this a special support dialogue is available. Open it by clicking the ![]() Settings icon in the message window or open the context menu of the message window and choose Settings.
Settings icon in the message window or open the context menu of the message window and choose Settings.
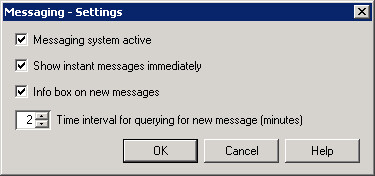
A selection dialogue appears:
Adjust the settings to your taste and confirm with "OK". The new settings are applied immediately.
The available settings are:
- Messaging system active: If the option is activated (default), ADOxx checks in regular intervals for new messages in the database and downloads them. If it is deactivated, you have to check for new messages manually.
- Show instant messages immediately: If the option is activated (default), then incoming instant messages - meaning the whole message with sender, time stamp, title, and text - are shown in a pop-up window. Otherwise instant messages are only announced by an info box.
- Info box on new messages: If the option is activated (default), then incoming messages are announced by an info box. If it is deactivated, then only an acoustic signal announced the message.
- Time interval for querying for new message (minutes): Enter the interval (in minutes) you want to check for new messages in the ADOxx database (default: 2min).