Notebook
This page covers the basics of the Notebook user interface used in ADOxx.
Notebook Basics
The Notebook is used to show and edit the attributes or properties of different types of elements, like attributes of models and objects, user settings or configuration attributes of an Application Library. The following image shows an example for a Notebook for an "Aggregation" object in a model: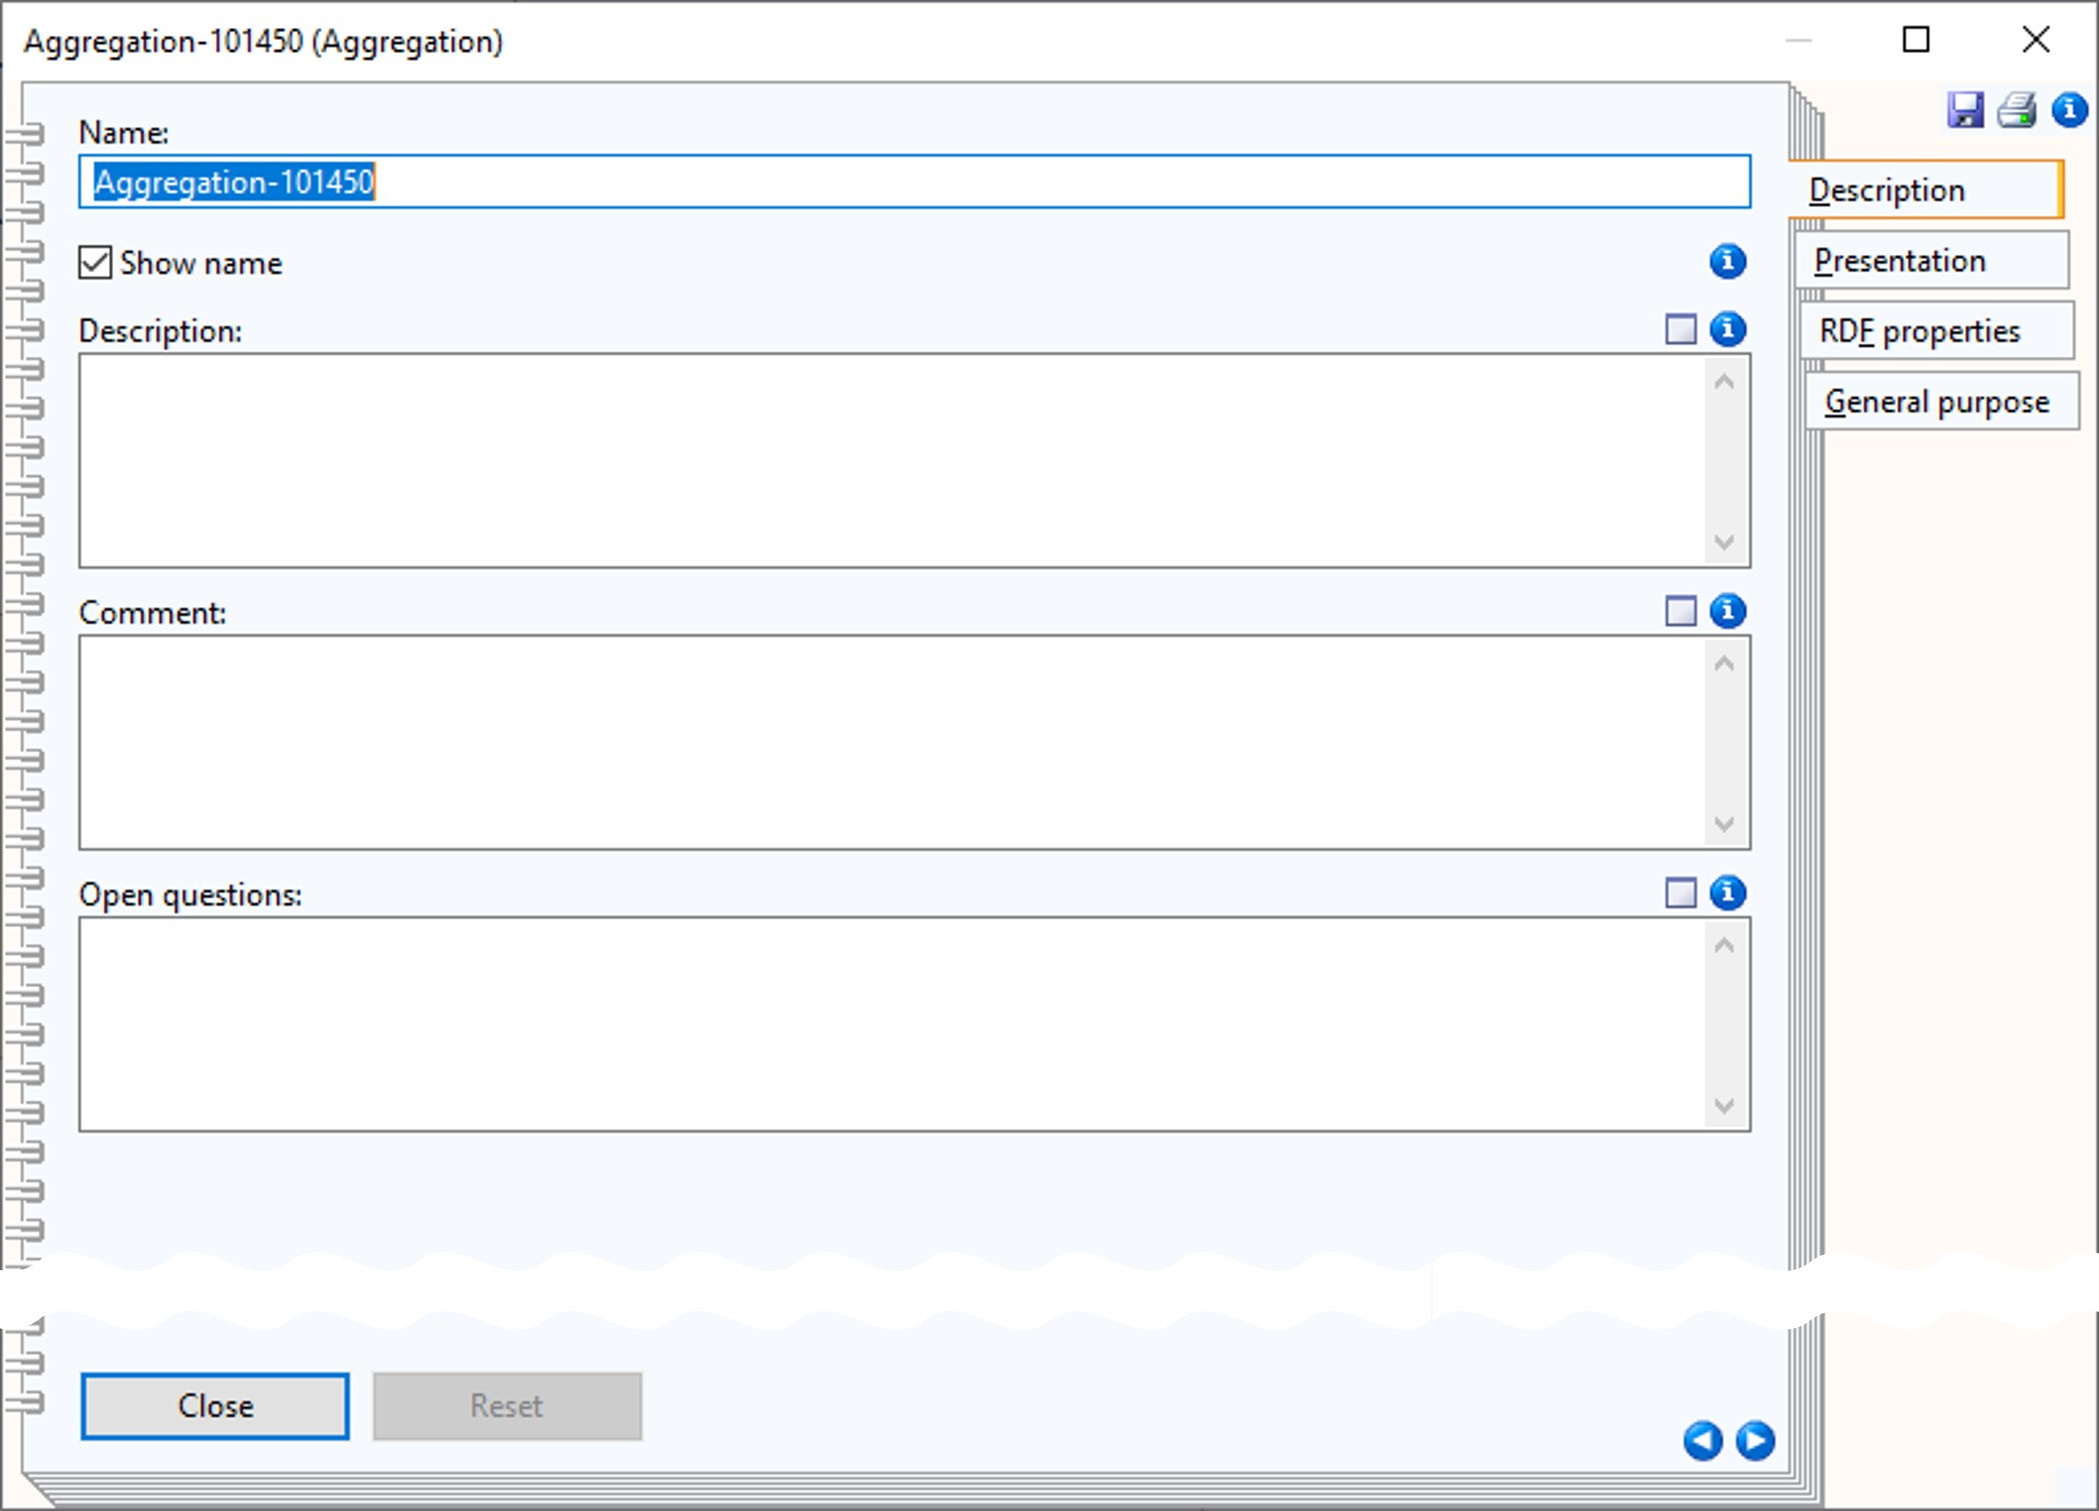
A Notebook is a window of which multiple can be open at the same time, that can be moved around freely and that provide various control elements to show, edit and navigate properties / attributes.
Notebook Structure
The general structure of a Notebooks is:
A Notebook consists of one or more chapters, which in turn contain one or more pages. The tabs on the right side allow to switch between the chapters. If a chapter contains more than one page, then the pages are numbered and can be switched between using the page navigation buttons at the bottom right. The other two buttons Close and Reset at the bottom left allow to close the notebook or undo the change to the currently edited attribute respectively.
The remainder of a Notebook is taken up by the attributes. How attributes are presented to the user depends on their type and the configuration in the Application Library. Details are described later in the Attribute Representation section.
In addition to using the mouse to navigate the Notebook it is also possible to use keyboard shortcuts and access keys to access specific chapters, attributes or navigate to the next or previous page.
Notebooks also contain a number of buttons depicted as icons, which carry out specific functions and assist in the input of various attribute values. Which buttons are available depend on the context and the configuration of the Application Library.
Common Actions
The following common icons and their actions can be found in a Notebook:
| Icon | Name | Action |
|---|---|---|
| Info | Shows additional information about the attribute or class. Also called "help text". Often used for documentation purposes and to provide additional hints. | |
| Dialog | Opens an input support dialog (see Attribute Representation section) window to help with editing the attribute. The type of dialog depends on the type of the attribute and specific configuration of the Notebook. | |
| Save (Ctrl + s) | Allows to save the attribute values of the entire Notebook in a text file. | |
| Print (Ctrl + p) | Allows to print the attribute values of the entire Notebook as plain text. Pressing the button directly sends the print job to the configured printer! | |
| Next page (Alt + +) | Switches to the next page of the Notebook. | |
| Previous page (Alt + -) | Switches to the previous page of the Notebook. |
Attribute Representation
The way attributes or properties are shown and can be edited in a Notebook mainly relies on their type, withe some additional control through the configuration in the Application Library, like using specific elements to represent the values. The allowed values can further be constrained through their configuration.
The input support dialogs (just called dialogs in this section) help with entering data for an attribute, especially if the attribute supports longer or more complex values. They can also be used for read-only attributes, in which case the dialog only provides a clearer presentation of the value. What type of dialog is shown depends on the type of attribute and the configuration of the Notebook.
The following sections provide an overview of the most common representations encountered and their dialogs, starting with the simpler types and progressing to types that are more specific to ADOxx. These assume that no special restrictions are configured.
Configuration details
Various parts can be configured through the Application Library to create a modelling tool. Details on the various attribute types and how they can be constrained are found later on the Attribute Types page while details for the configuration of Notebooks and the dialogs are described later in the AttrRep page.
Text Attributes
Attributes for text values are represented as simple text fields. Depending on the definition of the attribute either a single line text field or a multi line text box is provided, based on whether line breaks are allowed as part of the text or not.

In most cases the ![]() Dialog icon simply opens the text box in a new resizable window for easier editing of long values. In some niche cases it can open a dialog where a model of the same type can be selected, whose name and version is then entered as the text.
Dialog icon simply opens the text box in a new resizable window for easier editing of long values. In some niche cases it can open a dialog where a model of the same type can be selected, whose name and version is then entered as the text.
Numeric Attributes
Attributes for integer or floating-point values are represented as a single line text field, which only allows to enter valid numbers. The floating-point of a value can be provided either as a period . or a comma ,. Positive and negative values can be entered, but thousands separators should be avoided.
Integer values can also be depicted through a check box to toggle between two specific values. These values are typically 0 (for "false", ![]() unchecked) and
unchecked) and 1 (for "true", ![]() checked).
checked).
Date and Time Attributes
Attributes for date, time or both are represented as a single line text field expecting a specific format for the entered value:
- Date:
YYYY:MM:DD(year : month : day)
- Time:
YY:DDD:hh:mm:ss(years : days : hours : minutes : seconds)
- Date and time:
YYYY:MM:DD hh:mm:ss(year : month : day hour : minute : second)
The ![]() Dialog icon opens a new pop-up window which supports in entering the corresponding type of value in the appropriate format through various fields.
Dialog icon opens a new pop-up window which supports in entering the corresponding type of value in the appropriate format through various fields.
Enumeration Attributes
Attributes which only allow values from a predefined list can be represented in several ways. If only one value can be selected then the attribute is represented in one of the following ways:
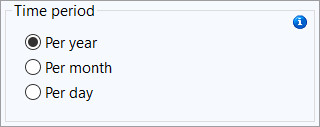
- A list of radio buttons showing all available options.
- A drop-down list showing only the currently selected option.

- A checkbox which switches between two specific values.
The selected value in the radio button list is indicated by the ![]() marking of the radio button.
marking of the radio button.
For a checkbox the values are typically "yes" (![]() unchecked) and
unchecked) and "no" (![]() checked) or something similar.
checked) or something similar.
When more than one value can be selected, then a list of the selected values is shown. New values can be added by selecting the ![]() Add icon or selected values can be removed through the
Add icon or selected values can be removed through the ![]() Delete icon.
Delete icon.
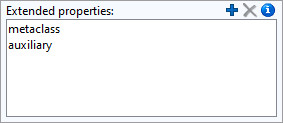
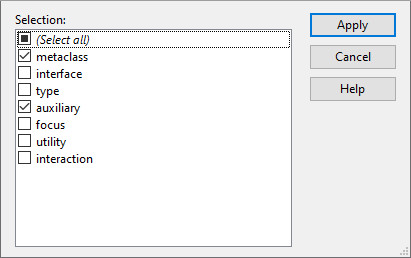
The ![]() Add icon opens a new pop-up window where all the values that can be selected are listed. These can be selected or deselected through the checkbox next to them.
Add icon opens a new pop-up window where all the values that can be selected are listed. These can be selected or deselected through the checkbox next to them.
Expression Attributes
Attributes for expressions are represented as simple text fields containing the result of evaluating the expression.
Some expression attributes can be edited. In such a case entering a value in the text field overwrites the expression with a constant value. Alternatively the ![]() Expression dialog icon can be used to open a dialog to help enter a value.
Expression dialog icon can be used to open a dialog to help enter a value.
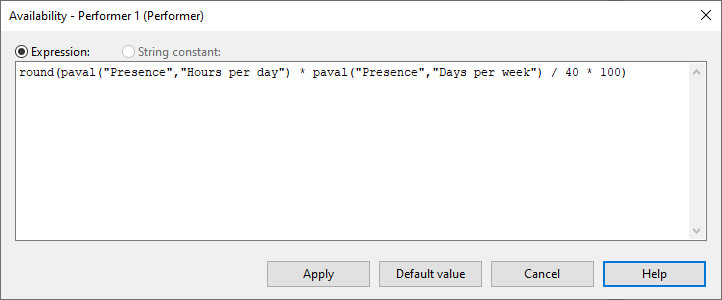
In this dialog you can enter an expression (Expression, also used for entering numbers, times etc.) or a text (String constant available when the allowed type is text / string). Click the Default value button to enter the default value defined in the Application Library.
Record / Table Attributes
Complex attributes which can contain multiple objects in a specific order (rows) which all have the same attributes are represented through a table, specifically an ADOxx Browser.

It provides most of the available common actions, with the following differences:
- Rows can be added, moved and deleted.
- Hiding columns is disabled.
- The built-in sorting option is disabled.
The actions for adding, moving and deleting rows are available through the icons at the top right (![]() Add or
Add or ![]() Delete) and through the context menu. Moving or deleting rows requires selecting the entire row by clicking the row handle, which in the above example is the number at the start of each row. Moving rows inserts them above the the selected row / space.
Delete) and through the context menu. Moving or deleting rows requires selecting the entire row by clicking the row handle, which in the above example is the number at the start of each row. Moving rows inserts them above the the selected row / space.
The ![]() Dialog icon simply opens the table in a new resizable window for easier editing of larger tables. In the new window use the context menu to add, move and remove rows.
Dialog icon simply opens the table in a new resizable window for easier editing of larger tables. In the new window use the context menu to add, move and remove rows.
Reference Attributes
Attributes which reference objects or models are represented as a simple list with icons depicting their type and a text identifying them by name. References are ordered naturally based on their text values, which differs from record attributes where rows are ordered based on their index.


Attributes which reference an Attribute Profile show instead the Attribute Profile's details (Attribute Profile's attributes with their values). The representation in this case depends on the types of attributes of the Attribute Profile and the configuration of its Notebook in the Application Library.
In all cases the ![]() Add and
Add and ![]() Delete icons are used to add and delete references. For references to objects and models a
Delete icons are used to add and delete references. For references to objects and models a ![]() Follow icon is also available to jump to the target of a reference.
Follow icon is also available to jump to the target of a reference.
Adding references to objects opens a new dialog: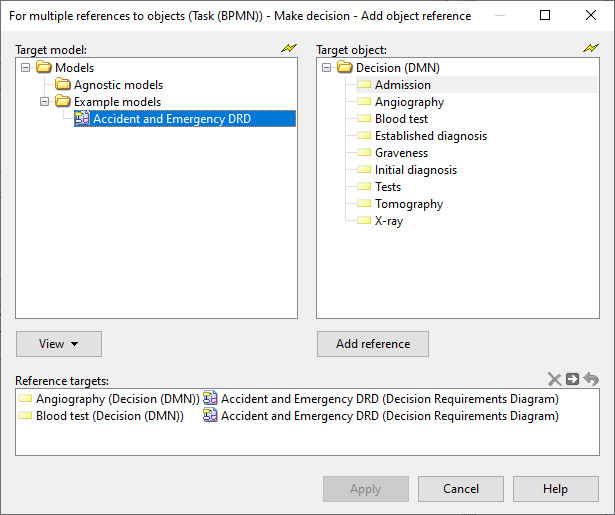
In this dialog select the model where the object is located in hierarchical list on the top left (Target model), then object or objects to reference in the list on the top right (Target object) and then select Add reference to add the references. If only one reference is allowed then the button will be labeled Add or Change instead. The bottom of the dialog contains a list of the current references. The icons next to it can be used to ![]() Delete,
Delete, ![]() Follow or
Follow or ![]() Undo any changes that have been made.
Undo any changes that have been made.
Adding references to models opens a similar dialog. The main difference is that only the Target model hierarchical list is shown: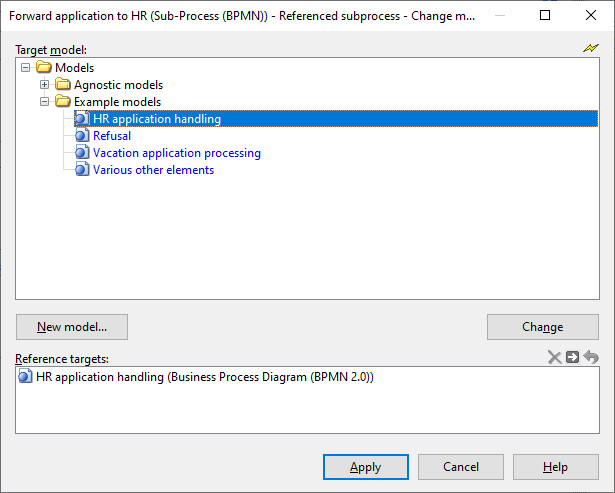
Alternatively for objects the action Copy object as reference target and for models the action Copy as reference target is available through their context menu. After performing those actions you can paste them into the reference attribute.
Adding references to Attribute Profiles opens a simple dialog showing all the Attribute Profile groups and Attribute Profiles. Select the desired Attribute Profile to reference and select Apply.
Program Call Attributes
Attributes for program calls allow to start a program with an optional parameter. Their representation depends on whether the program (Executable) can be selected or the parameter can be specified.
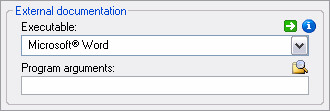


Selecting the program is possible through the provided drop-down list. If the program is fixed, then the program name or action is represented through a button instead. Selecting the ![]() Execute icon or the button will execute ("call") the program. The optional parameter can be specified through the Program arguments field. Selecting the
Execute icon or the button will execute ("call") the program. The optional parameter can be specified through the Program arguments field. Selecting the ![]() Browse icon opens the system's file selection dialog to select a file as the parameter.
Browse icon opens the system's file selection dialog to select a file as the parameter.
Color Attributes
Attributes for specifying colors are represented through various text fields.

Colors can be entered into the Color field either by name or as their hexadecimal representation. For a list of supported color names see LEO colors. When entering a hexadecimal representation follow the format of #rrggbb or $rrggbb for red, green and blue. For example use #ff0000 for the color red or $ffffff for the color white. Alternatively use the other available fields to adapt the color accordingly.
Selecting the rectangle that shows a preview of the color or selecting the ![]() Dialog icon opens a new pop-up dialog with the system's color picker.
Dialog icon opens a new pop-up dialog with the system's color picker.
Note
This is not a specific attribute type, just a special representation that can be used for text attributes. See dialog:color of ATTR command for details.
Actor / Resource Attributes
Attributes for assigning actors or resources are represented similar to text attributes. These are typically specified as a query using AQL

Selecting the ![]() Dialog icon opens a special dialog to help with selecting appropriate values.
Dialog icon opens a special dialog to help with selecting appropriate values.
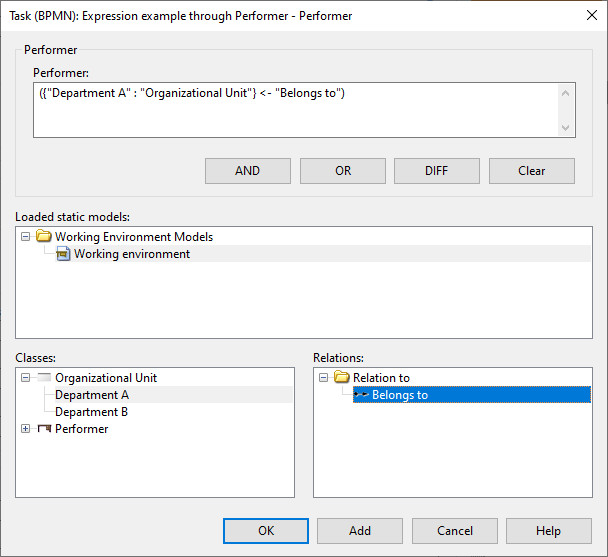
The top of the dialog contains the query with buttons to add code to combine multiple queries. The lists in the middle and the bottom allow to create a specific query by select existing objects. Note that only opened models are shown in the list in the middle. After selecting the necessary items from the lists (a model, a class or object and a relation in a specific direction) selecting the Add button at the bottom will create the query and append it to the value at the top.
Note
This is not a specific attribute type, just a special representation that can be used for text and expression attributes. See dialog:actor and dialog:resource of ATTR command for details.
Distribution Attributes
Attributes denoting a distribution are represented similar to text attributes. Functionalities that use their values typically expect a specific format.

Selecting the ![]() Dialog icon opens a new dialog to help entering a values.
Dialog icon opens a new dialog to help entering a values.
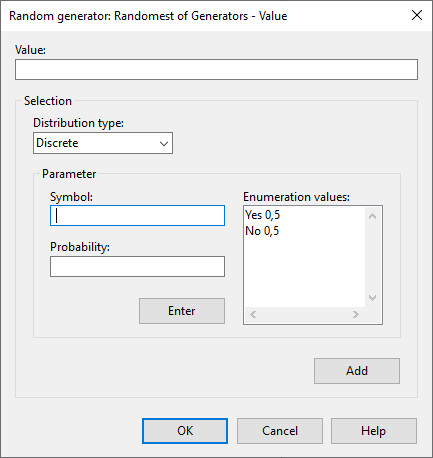
The Value at the top shows the current definition for the distribution. The fields in the Selection section are used to define a new distribution. First select the desired Distribution type. Discrete, Exponential, Normal and Uniform are available. These have the same meaning as in mathematics. After selecting the distribution use the fields in the Parameter section to specify their parameters. Afterwards select the Add button to append the definition of the distribution to the Value.
For Discrete distributions it is necessary to specify the possible values by entering their Symbol (a text), it's Probability and selecting Enter to add it to the Enumeration values. Double clicking on an item in the Enumeration values list will remove it from the list and place it in the other two fields instead.
Note
This is not a specific attribute type, just a special representation that can be used for text and expression attributes. See dialog:distribution of ATTR command for details.
Transition Condition Attributes
Attributes for specifying a transition condition are represented similar to text attributes. Functionalities that use their values typically expect a specific format.
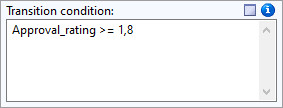
Selecting the ![]() Dialog icon opens a new dialog to help entering a value.
Dialog icon opens a new dialog to help entering a value.
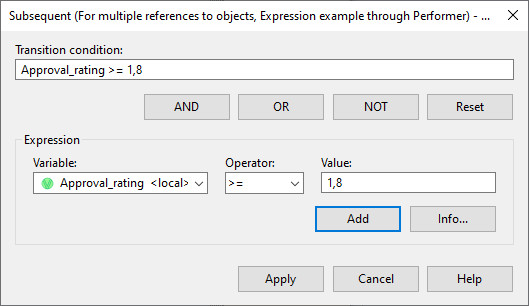
The text field at the top of the dialog shows the currently specified condition. The buttons right below it allow to add code to combine multiple conditions or clear the entire condition (Reset). The fields in the Expression section help in creating a condition which can then be appended to the current Transition condition through the Add button.
Note
This is not a specific attribute type, just a special representation that can be used for text attributes. See dialog:transcond of ATTR command for details.