Model Types
On this page the details about model types are described, including how they, their attributes and their graphical representation can be specified.
Model Type Basics
Model types represent meaningful combinations of (modelling) classes and relation classes as views to be used by the modeller to create models.
The following statements are relevant for model types, while specific details are described in the later sections:
- A model type determines a subset of all instantiable (modelling) classes and relation classes.
- Model types have attributes which allow to specify properties for them and their instances.
- The name of a model type should be shorter than 200 characters.
- Model type names are case-sensitive, meaning that
Model Type,Model typeandmodel typeare considered distinct model type names.
- Model type names are case-sensitive, meaning that
- Model types can have one or several views ("modes") specified, which restrict what classes can be interacted with in a model.
- Model types can belong to one or several model type groups (should not be confused with model group).
- Models are instances of exactly one model type which can not be changed afterwards.
- They also have a drawing area, where the objects are drawn as well as the graphical representation for the model type.
Drawing Area
The drawing area is the space where the contents of a model are drawn. It is typically just a white background, but its representation can be changed (see custom drawing area graphic).
The size of the drawing area can be changed, for example by clicking and dragging its edges. It is automatically extended when objects are placed outside of the current drawing area. By default the drawing area of a new model is set to the print area of an A4 paper size page.
The following images show a default empty drawing area:
Model Type Views
A view ("mode") is a further restriction of a model type. It defines a subset of the assigned classes and simplifies modelling by hiding not needed classes. The "mode" of a model can be changed any time unlike the model type.
A view is specified using the MODE command.
Model Type Groups
Model type groups should be defined, if the application library consists of many different model types. This allows to group and structure the available model types in various parts of the user interface.
A model type group is specified by using the GROUP command as part of a METHOD command.
Managing Model Types
Model types are managed through the Modi library attribute of the dynamic and the static library.
Any changes are only applied to the database after the library is saved.
Accessing Library Attributes
To access the library attributes of a library select the ![]() Library management component. Once the component is active use the Libraries -> Settings menu or the
Library management component. Once the component is active use the Libraries -> Settings menu or the ![]() Settings icon in the quick access bar. These open a separate pop-up dialog showing the available Application Libraries.
Settings icon in the quick access bar. These open a separate pop-up dialog showing the available Application Libraries.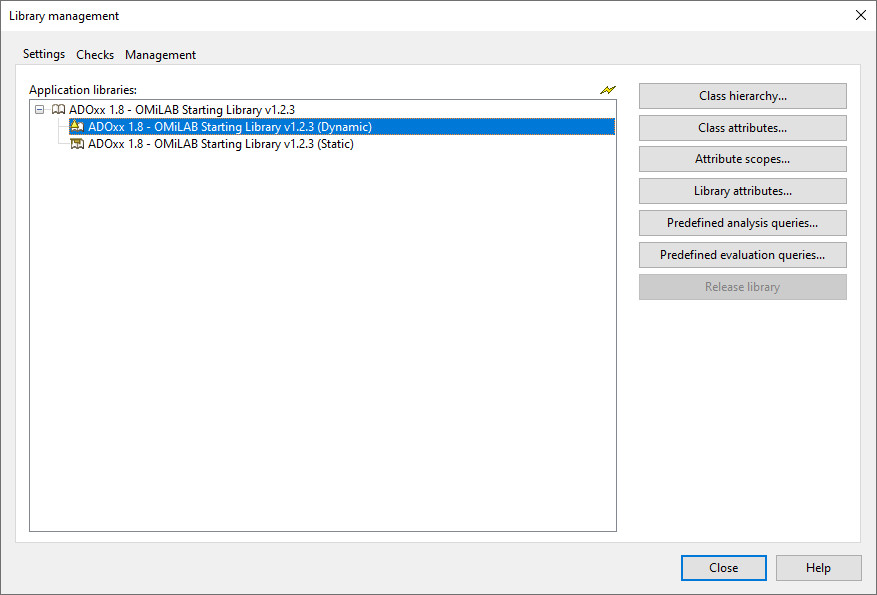
Select the library you want to manage the library attributes for and select the Library attributes... button to open another pop-up dialog showing the library attributes in a Notebook. Only the Dynamic and the Static Library have library attributes.
In the Notebook select the Add-ons chapter. The Modi library attribute is located at the start of the chapter. The following image shows the Modi library attribute for a Dynamic Library where one model type using three classes and two view modes is specified.
The details for the model types are specified using a specific syntax which is superficially described later (or see the Modi library attribute for a comprehensive description). The ![]() Dialog icon can be selected to open a larger dialog for editing the attribute.
Dialog icon can be selected to open a larger dialog for editing the attribute.
Changes to the library attributes can be saved by selecting Apply in the Notebook, which will also close the Notebook. The ADOxx platform first performs some checks, informs about any possible issues via pop-up windows and if no issues have been encountered asks whether the changes should be saved to the database.
Creating a Model Type
- Open the
Modilibrary attribute where the model type should be created.- Select the
 Dialog icon to open a larger dialog for easier editing of longer values.
- Select the
- Add a new
MODELTYPEcommand with the model type details. - Specify the allowed classes using the
fromparameter andINCLandEXCLcommands. - Specify the views of the model type using the
MODEcommands.
Note that while the name of a model type can be changed after it has been created, it is not updated for any existing models. This can lead to having "dead models" in the data storage that can no longer be accessed. Consider exporting and deleting all models of the model type before changing the model type name.
Modifying a Model Type
- Open the
Modilibrary attribute where the model type should be created.- Select the
 Dialog icon to open a larger dialog for easier editing of longer values.
- Select the
- Find the
MODELTYPEcommand for the desired model type. - Change any details of the model type, the included classes and the available modes.
Note that while the name of a model type can be changed after it has been created, it is not updated for any existing models. This can lead to having "dead models" in the data storage that can no longer be accessed. Consider exporting and deleting all models of the model type before changing the model type name.
Deleting a Model Type
- Open the
Modilibrary attribute where the model type should be created.- Select the
 Dialog icon to open a larger dialog for easier editing of longer values.
- Select the
- Find the
MODELTYPEcommand for the desired model type. - Delete the command and any other commands following it which configure the model type, like
INCL,EXCLandMODEcommands.
Note that deleting a model type does not delete existing models. This can lead to having "dead models" in the data storage that can no longer be accessed. Consider exporting and deleting all models of the model type before deleting the model type.
Modi Syntax
The Modi library attribute uses a specific syntax to specify model types. This section focuses superficially on some of the capabilities. For comprehensive details see the Modi library attribute documentation.
The syntax has roughly the following structure:
Modi - General Configuration
The general configuration uses a single command to control the order of classes:
GENERAL [ order-of-classes:custom ] .When the command is omitted or a value different from custom is specified, then a "default order" of classes will used which is based on some platform interior criteria. Specifying order-of-classes:custom will instead use the order in which classes are added to a model type. It is recommended to use GENERAL order-of-classes:custom.
Modi - Method and Groups Configuration
A method can be specified for a library, which allows to group model types. This has an influence in various parts of the Modelling Toolkit interface, like providing model type filters based on the specified groups. The method can also have a graphical representation which is shown as part of the Create new model dialog.
The following image shows an example where the graphical representation of the method is visible on the left side, while the drop-down list in the top-center shows a selected model type filter and only the corresponding models types in the list below.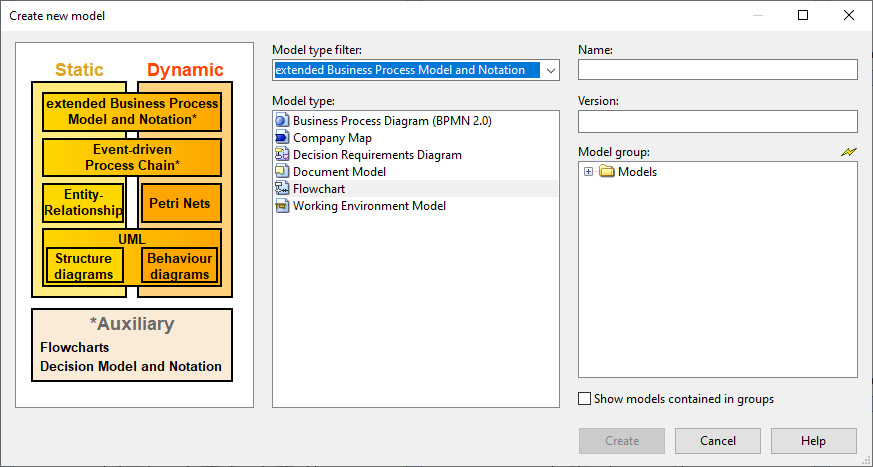
The syntax for defining a method and its groups is:
METHOD [ graphrep:strValue ] { { GroupDefinition } } .

GroupDefinition : GROUP strValue [ default ] { { ModelTypeReference } } .

ModelTypeReference : MODELTYPE strValue .

# Note: the outer curly brackets must be written as part of the code,
# while the inner curly brackets indicate "zero or more" repeatable parts.
Groups are defined as part of a method and are provided with a name (via strValue). When default is specified for a group then it is selected as the default for dialogs. A group contains zero or more references to model types by using the MODELTYPE command where the name of the model type is specified as its main parameter (via strValue).
The graphical representation for the method is specified through the graphrep parameter, which can be omitted. It works similar to a custom drawing area graphic with some differences:
- It does not have the preset variables
wandh. - Instead a preset variable
mtgroupis available that holds the current model type group name. - For a
HOTSPOTthe name of a model type group should be specified instead of an attribute name. This will change the model type filter when the specific area is selected.
The following shows an example for a method definition with two groups and a custom graphical representation:
METHOD graphRep:"Method GraphRep" {
  GROUP "First two model types" {
    MODELTYPE "My First Model Type"
    MODELTYPE "My Second Model Type"
  }
  GROUP "All model types" {
    MODELTYPE "My First Model Type"
    MODELTYPE "My Second Model Type"
    MODELTYPE "My Third Model Type"
    MODELTYPE "My Forth Model Type"
  }
}
Modi - Attribute Display
The attribute display configuration allows to show an icon next to a model based on the value of a model attribute. This is visible in some model selection lists, like the Explorer in the Modelling Toolkit.
The syntax is:
DISPLAYED_MODELATTR strValue [ default-hidden ] { ValueIconMapping } .

ValueIconMapping : enum-value<intValue>:strValue bitmap<intValue>:strValue .
The main parameter (through strValue) specifies the name attribute to get the value from. The value of the attribute is then compared with the value-icon-mappings. The enum-value<intValue> parameter of a value-icon-mapping specifies for which attribute value it is, while the bitmap<intValue> parameter defines a path to a bitmap file with the icon to display in that case. The <intValue> of those two parameters should be an integer value starting from 1 and increasing for each value-icon-mapping.
The following example uses the value of a model attribute "State" to display a grey, orange or green icon: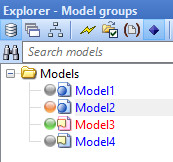
DISPLAYED_MODELATTR "State" default-hidden
    enum-value1:"In process" bitmap1:"db:\\symbol_state_s_draft.bmp"
    enum-value2:"Ready" bitmap2:"db:\\symbol_state_s_qa.bmp"
    enum-value3:"Reviewed" bitmap3:"db:\\symbol_state_s_released.bmp"
Modi - Model Type Definition
Model types are defined with the MODELTYPE command and are followed by other commands providing additional details, like which classes should be available or which view modes a model type has.
The general syntax, omitting various details, is:
MODELTYPE strVale [ plural:strValue ] [ from:ModelTypeSource ] [ bitmap:strValue ]
    [ attrrep:strValue ] [ graphrep:strValue ]
  AvailableClasses
  { ViewMode } .

ModelTypeSource : none | all | strValue .

AvailableClasses : { IncludeClass | ExcludeClass } .

IncludeClass : INCL strValue .

ExcludeClass : EXCL strValue .

ViewMode : MODE strValue [ from:ModelTypeSource ] AvailableClasses .
The above syntax only list a part of the configuration possibilities for model types. For a comprehensive description of the syntax see the Modi library attribute.
The name of the model type is specified through the main parameter (via strValue). With plural a plural name of a model type can be specified. Through from the list of available classes can be "inherited", which should be either the value none, all or the name of another model type. The bitmap parameter defines a graphical symbol used for the model type where it's strValue should be a path to a file, preferably located in the database (backslashes \ must be masked with an additional backslash as \\). With the attrrep and graphrep parameters the Notebook structure for models attributes and a custom graphic on the drawing area can be specified.
Adaptations to the classes that are allowed in a model type are specified after the MODELTYPE command using INCL and EXCL commands. These either add ("include") or remove ("exclude") a class from the list of available classes. The initial list is based on the value provided for the from parameter of the MODELTYPE command. The INCL and EXCL commands should have the name of a class from the library as their main parameter. Remember that class names are case sensitive.
After the available classes of a model type have been specified the different view modes are defined using the MODE command. The name of the view is specified as the main parameter and similar to model types the from defines the list of classes to "inherit" for the mode. Note that a view can only contain classes that are also available in the model type. The list of classes available in the mode can again be further modified using the INCL and EXCL commands. It is recommended for each model type to have at least one view mode specified.
The following example specifies a model type "Hello World" which uses two (modelling) classes and one relation class and which has two modes specified:
MODELTYPE "Hello World" from:none
  INCL "Hello"
  INCL "World"
  INCL "HelloAnything"
  MODE "All" from:all
  MODE "World only" from:none
    INCL "World"
Model Attributes
It is is possible to create and define additional model attributes. All additional model attributes are stored in a class in the Dynamic Library called __ModelTypeMetaData__. You can add attributes of any type, except Inter-model Reference (INTERREF) and Attribute Profile Reference (PROFREF / ATTRPROFREF). When using Record table (RECORD) attributes, then the referenced record class must not contain any Inter-model Reference (INTERREF) attribute.
To specify the the structure of the Notebook for a model type, two steps have to be performed:
- Add a class attribute of Long String (LONGSTRING) type to the class
__ModelTypeMetaData__of the dynamic library. This attribute will be used for the AttrRep definition for the model type, so specify the AttrRep code to use as its default value. You may choose any attribute name, likeAttrRep_ModelTypeNamefor a model typeModelTypeName. - Add an
attrrepparameter to the model type definition (MODELTYPEcommand). The model type definition is contained in the library attributeModi. There you have to specify the name of the attribute which contains the AttrRep definition e.g.attrrep:"AttrRep_ModelTypeName"
Missing __ModelTypeMetaData__
If for any reason the abstract class __ModelTypeMetaData__ is missing from your library, simply redefine it as a subclass of class __D-construct__. This class must exist only in the dynamic library. Ensure that the ClassAbstract class attribute is set to 1 (true).
If no custom Notebook structure is specified, then a default set of attributes is provided via the Notebook.
Custom Drawing Area Graphic
It is possible to define a custom graphical representation for drawing the background on the drawing area of a model type. A model is in this case considered similar to an object, so model attributes can be accessed as part of the GraphRep.
The following image shows an example of a drawing area for a model type with a custom graphical representation and without any objects.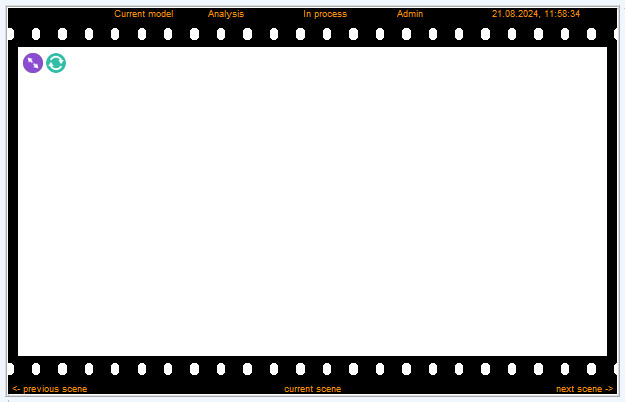
To define a GraphRep for to use on the drawing area of a model type, two steps have to be performed:
- Add a class attribute of Long String (LONGSTRING) type to the class
__ModelTypeMetaData__of the dynamic library. This attribute will be used for the GraphRep definition for the model type, so specify the GraphRep code to use as its default value. You may choose any attribute name, likeGraphRep_ModelTypeNamefor a model typeModelTypeName. - Add a
graphrepparameter to the model type definition (MODELTYPEcommand). The model type definition is contained in the library attributeModi. There you have to specify the name of the attribute which contains the GraphRep definition e.g.graphrep:"GraphRep_ModelTypeName"
It is possible to specify the layer in the GRAPHREP command for the model type. If a high layer index is specified at the model type's GraphRep, it is more of a foreground than a background graphic. To draw a graphic which lies behind all objects, you have to specify the lowest index used at a modelling object's GraphRep.
In the model type's GraphRep, model attributes can be accessed via ATTR and AVAL commands. This applies also for custom model attributes. It is also possible to use HOTSPOT commands to realize custom user interactions on the drawing area itself.
A model type's GraphRep also has the following variables preset:
w: the current width of the drawing area.h: the current height of the drawing area.
These make it possible to draw lanes or shapes across the whole width or height, to place a text at the bottom of the drawing area etc.
Missing __ModelTypeMetaData__
If for any reason the abstract class __ModelTypeMetaData__ is missing from your library, simply redefine it as a subclass of class __D-construct__. This class must exist only in the dynamic library. Ensure that the ClassAbstract class attribute is set to 1 (true).