Publish your Modelling Tool on omilab.org
This section shows how you can add your modelling tool to the collection of tools of the OMiLAB Community: https://www.omilab.org/activities/projects/.
There are two variants for publishing your tool:
Both cases require that you posses an project in the modelling_tools (https://code.omilab.org/resources/modelling_tools) group of OMiLAB's GitLab. If you do not have it already, please create the basic structure of the project in the ADOxx Modelling Tool Development group, as described in the Preparation section. After you have created this project, please contact us at info@adoxx.org with the link to your project and we will prepare the project for the publication and inform you.
Publish a New Version of your Modelling Tool
This section describes how you can publish a new version of an existing modelling tool on OMiLAB's community tools page. The focus here is to create and add the download links for the new tool version.
Prerequisites:
- You have updated and packaged your modelling tool according to the procedure described here
- The installation files in the
TOOLfolder are up-to-date and tested - Make sure the ADOxx library (
.abl) file in theLIBRARYfolder of your GitLab project is the current version of your tool - The files in the
DOCUMENTATIONfolder of your GitLab project are updated accordingly - Your project in the
modelling_toolsgroup is set topublic
To make the new installation files available for download on https://www.omilab.org/activities/projects/, you have to make a new release of your tool, in the GitLab project:
- Open the GitLab project of your tool
- Click
Deploy - Click
Releases - Click
New release
- Click
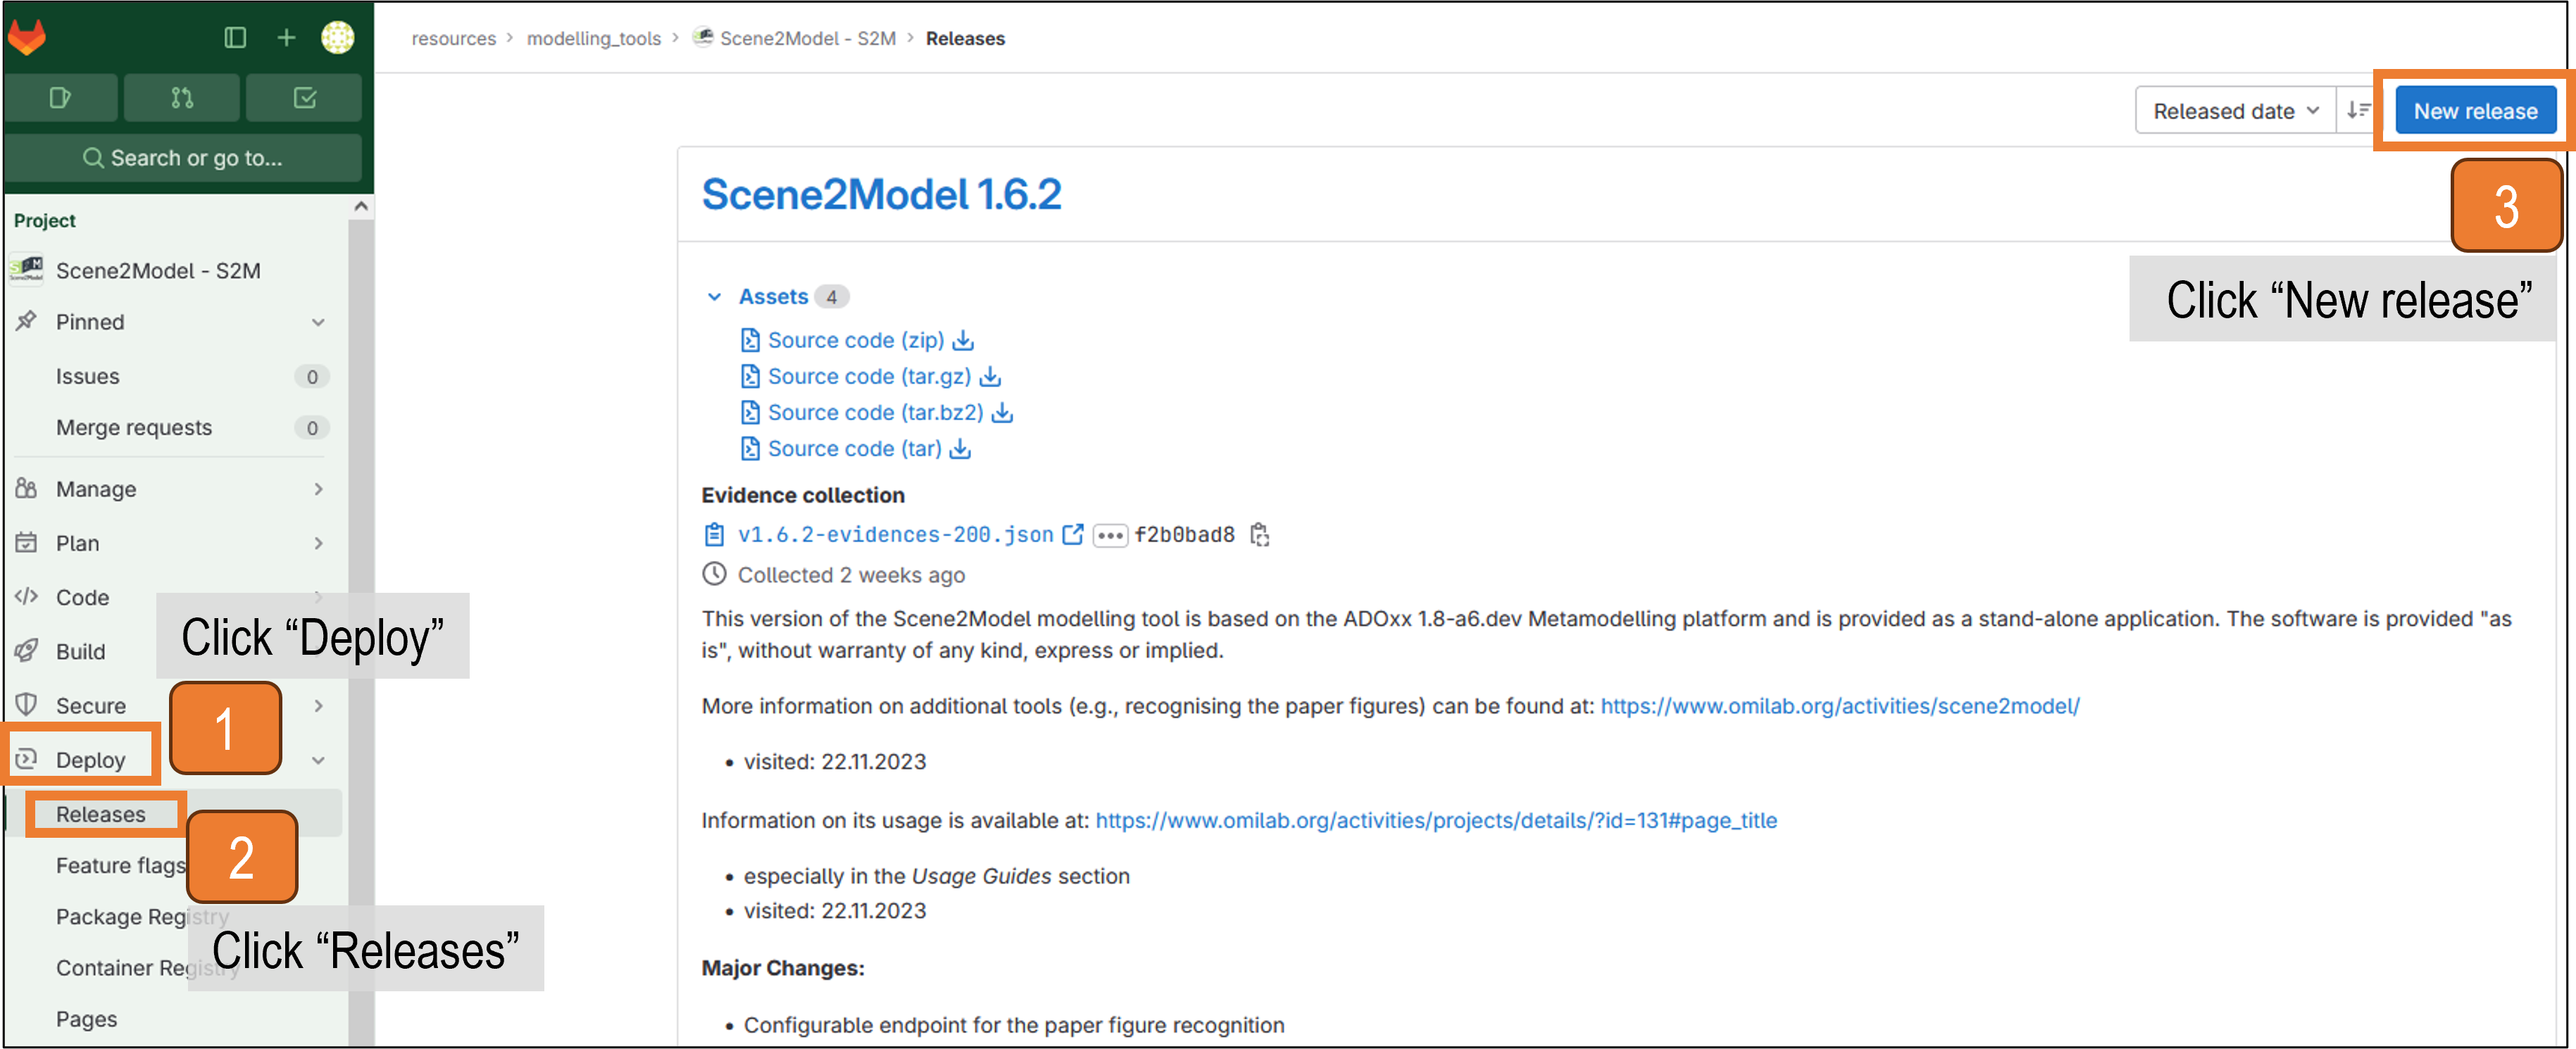 Create a new release for your modelling tool
- Provide a
Tag name, containing your version- Open the drop-down menu of the
Tag namefield
1a. In the search field type in the new name that you want to use
1b. Click onCreate tag \<your-tag-name\>
1c. Click onSave - Fill in the
Release title
2a. Fill in theRelease date
2b. Add a description of the release inRelease notes
2c. Add all the information fitting for your tool - Click
Create release
- Open the drop-down menu of the
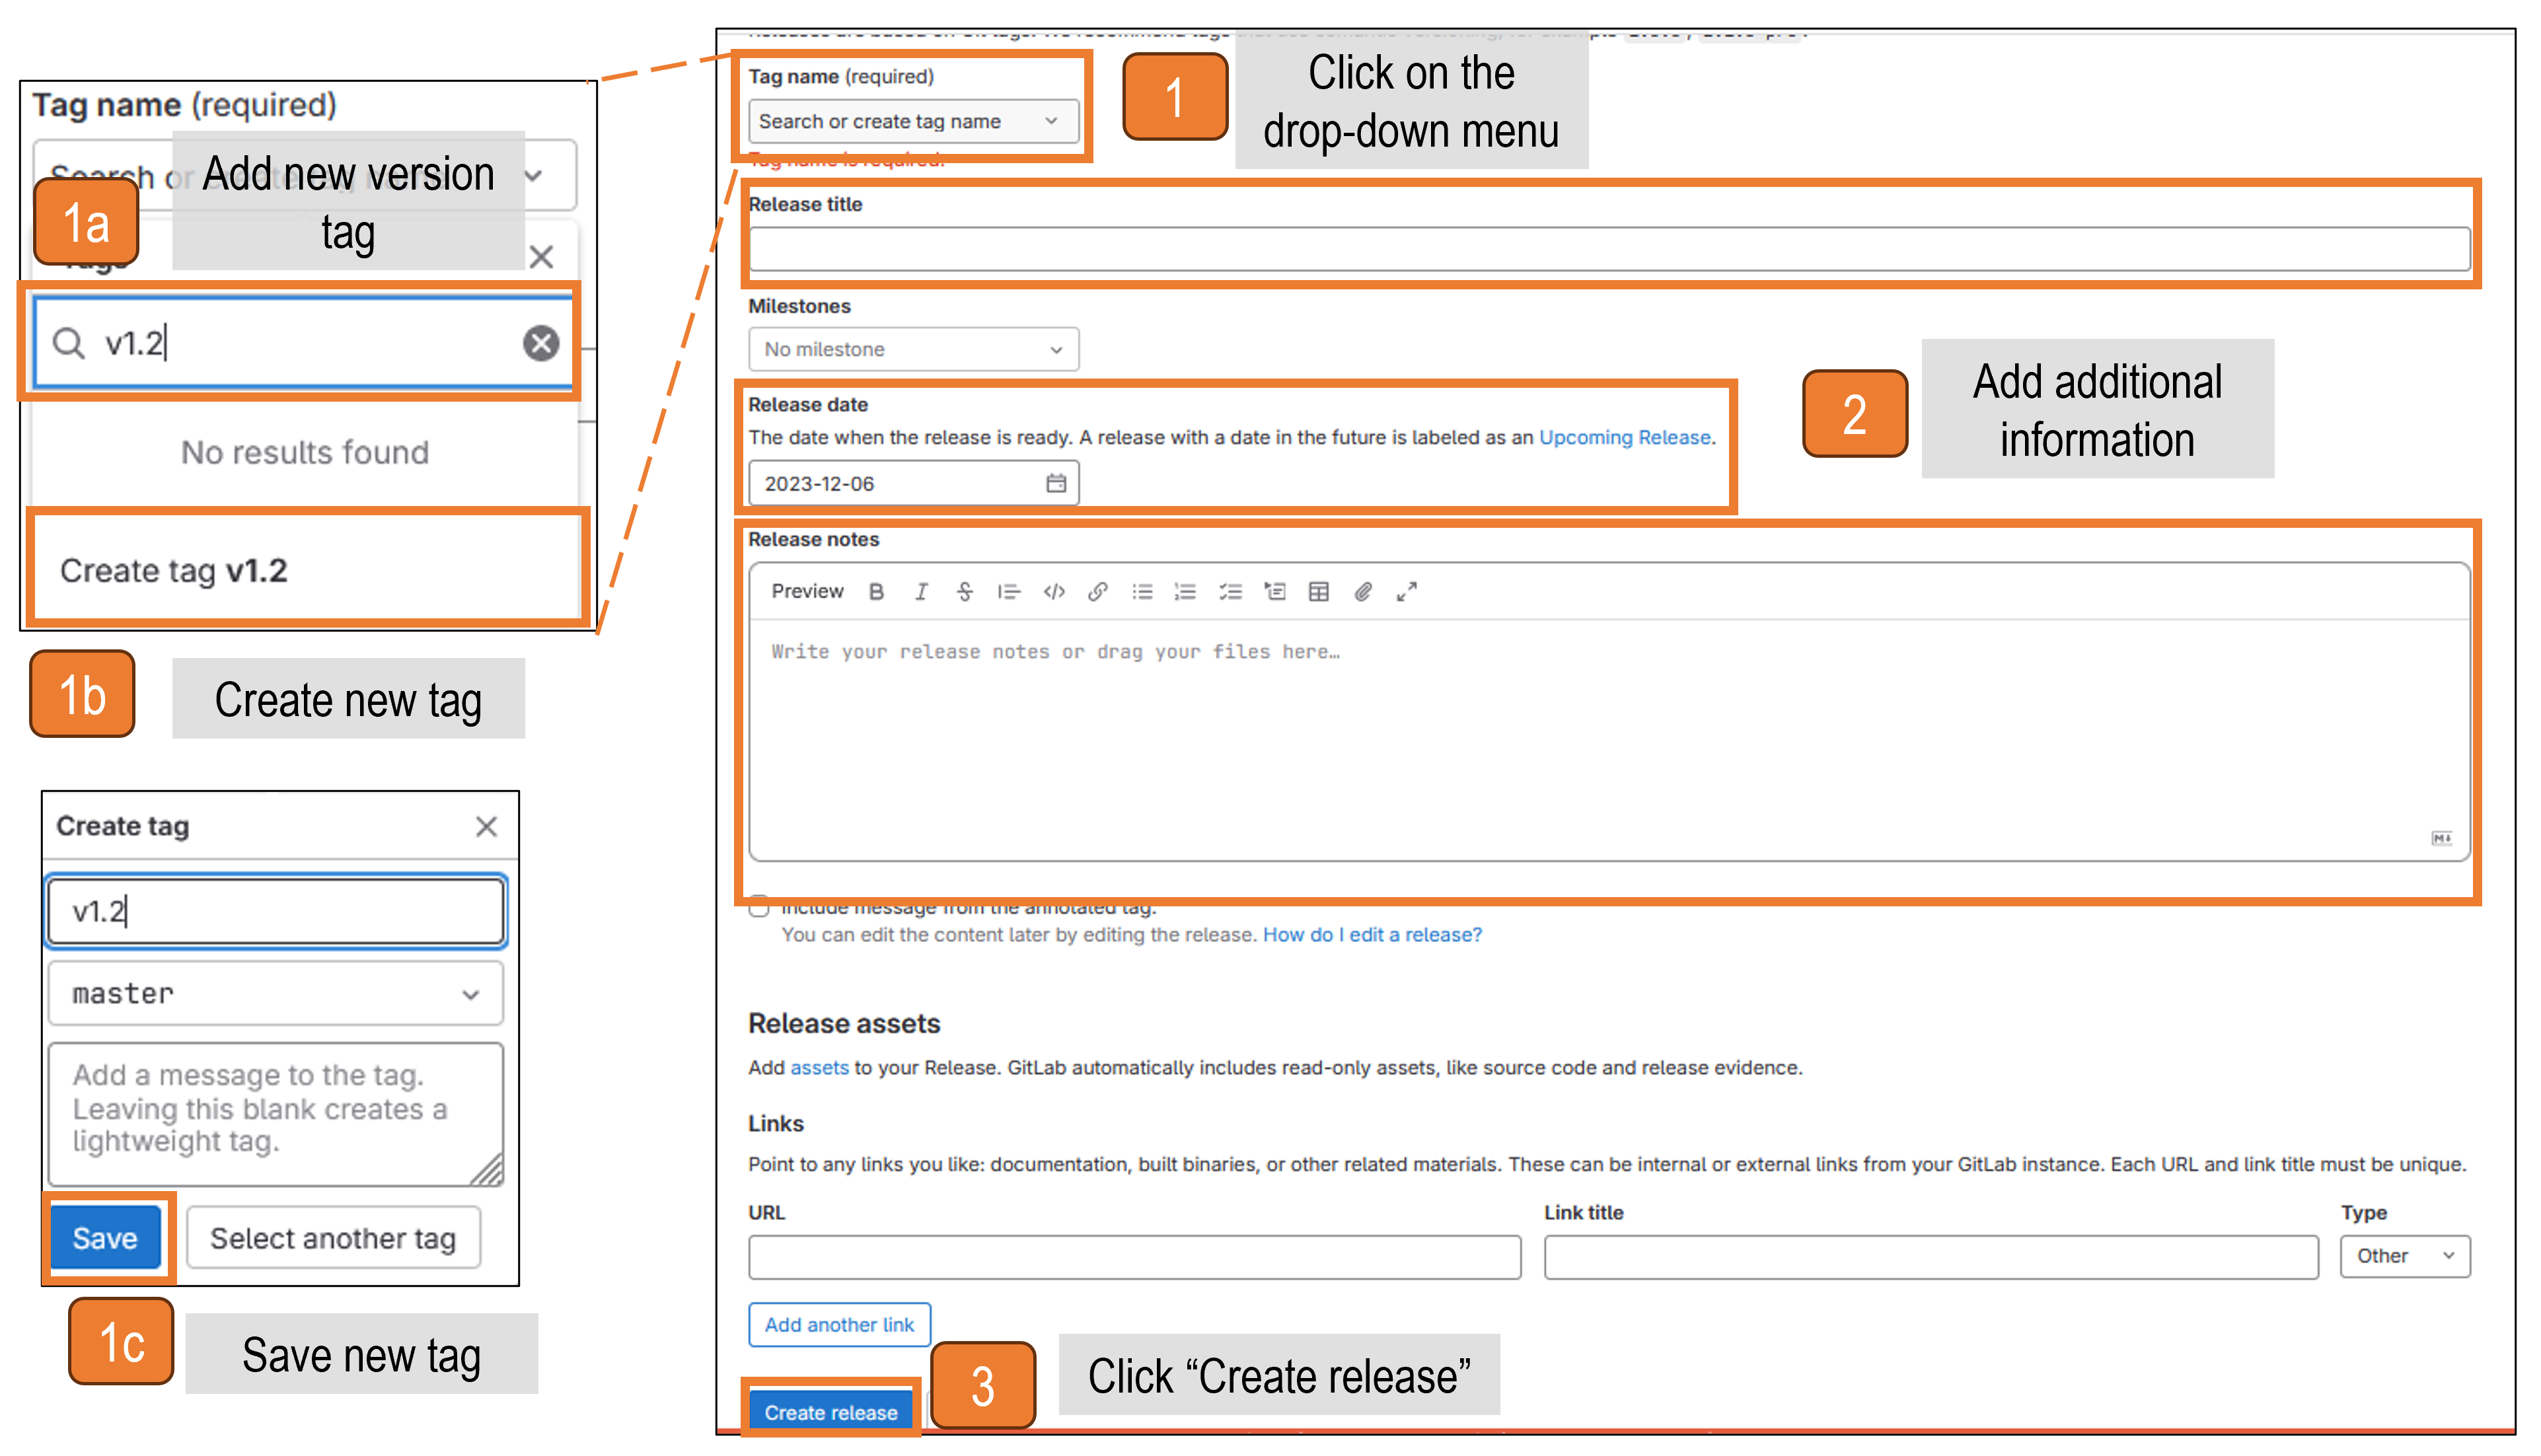 Fill out the information for the release
Check if the download is available on the modelling tool page
- Open the webpage of your modelling tool
- Click on the
Downloadmenu - Check if your new release is shown
- Test the download packages
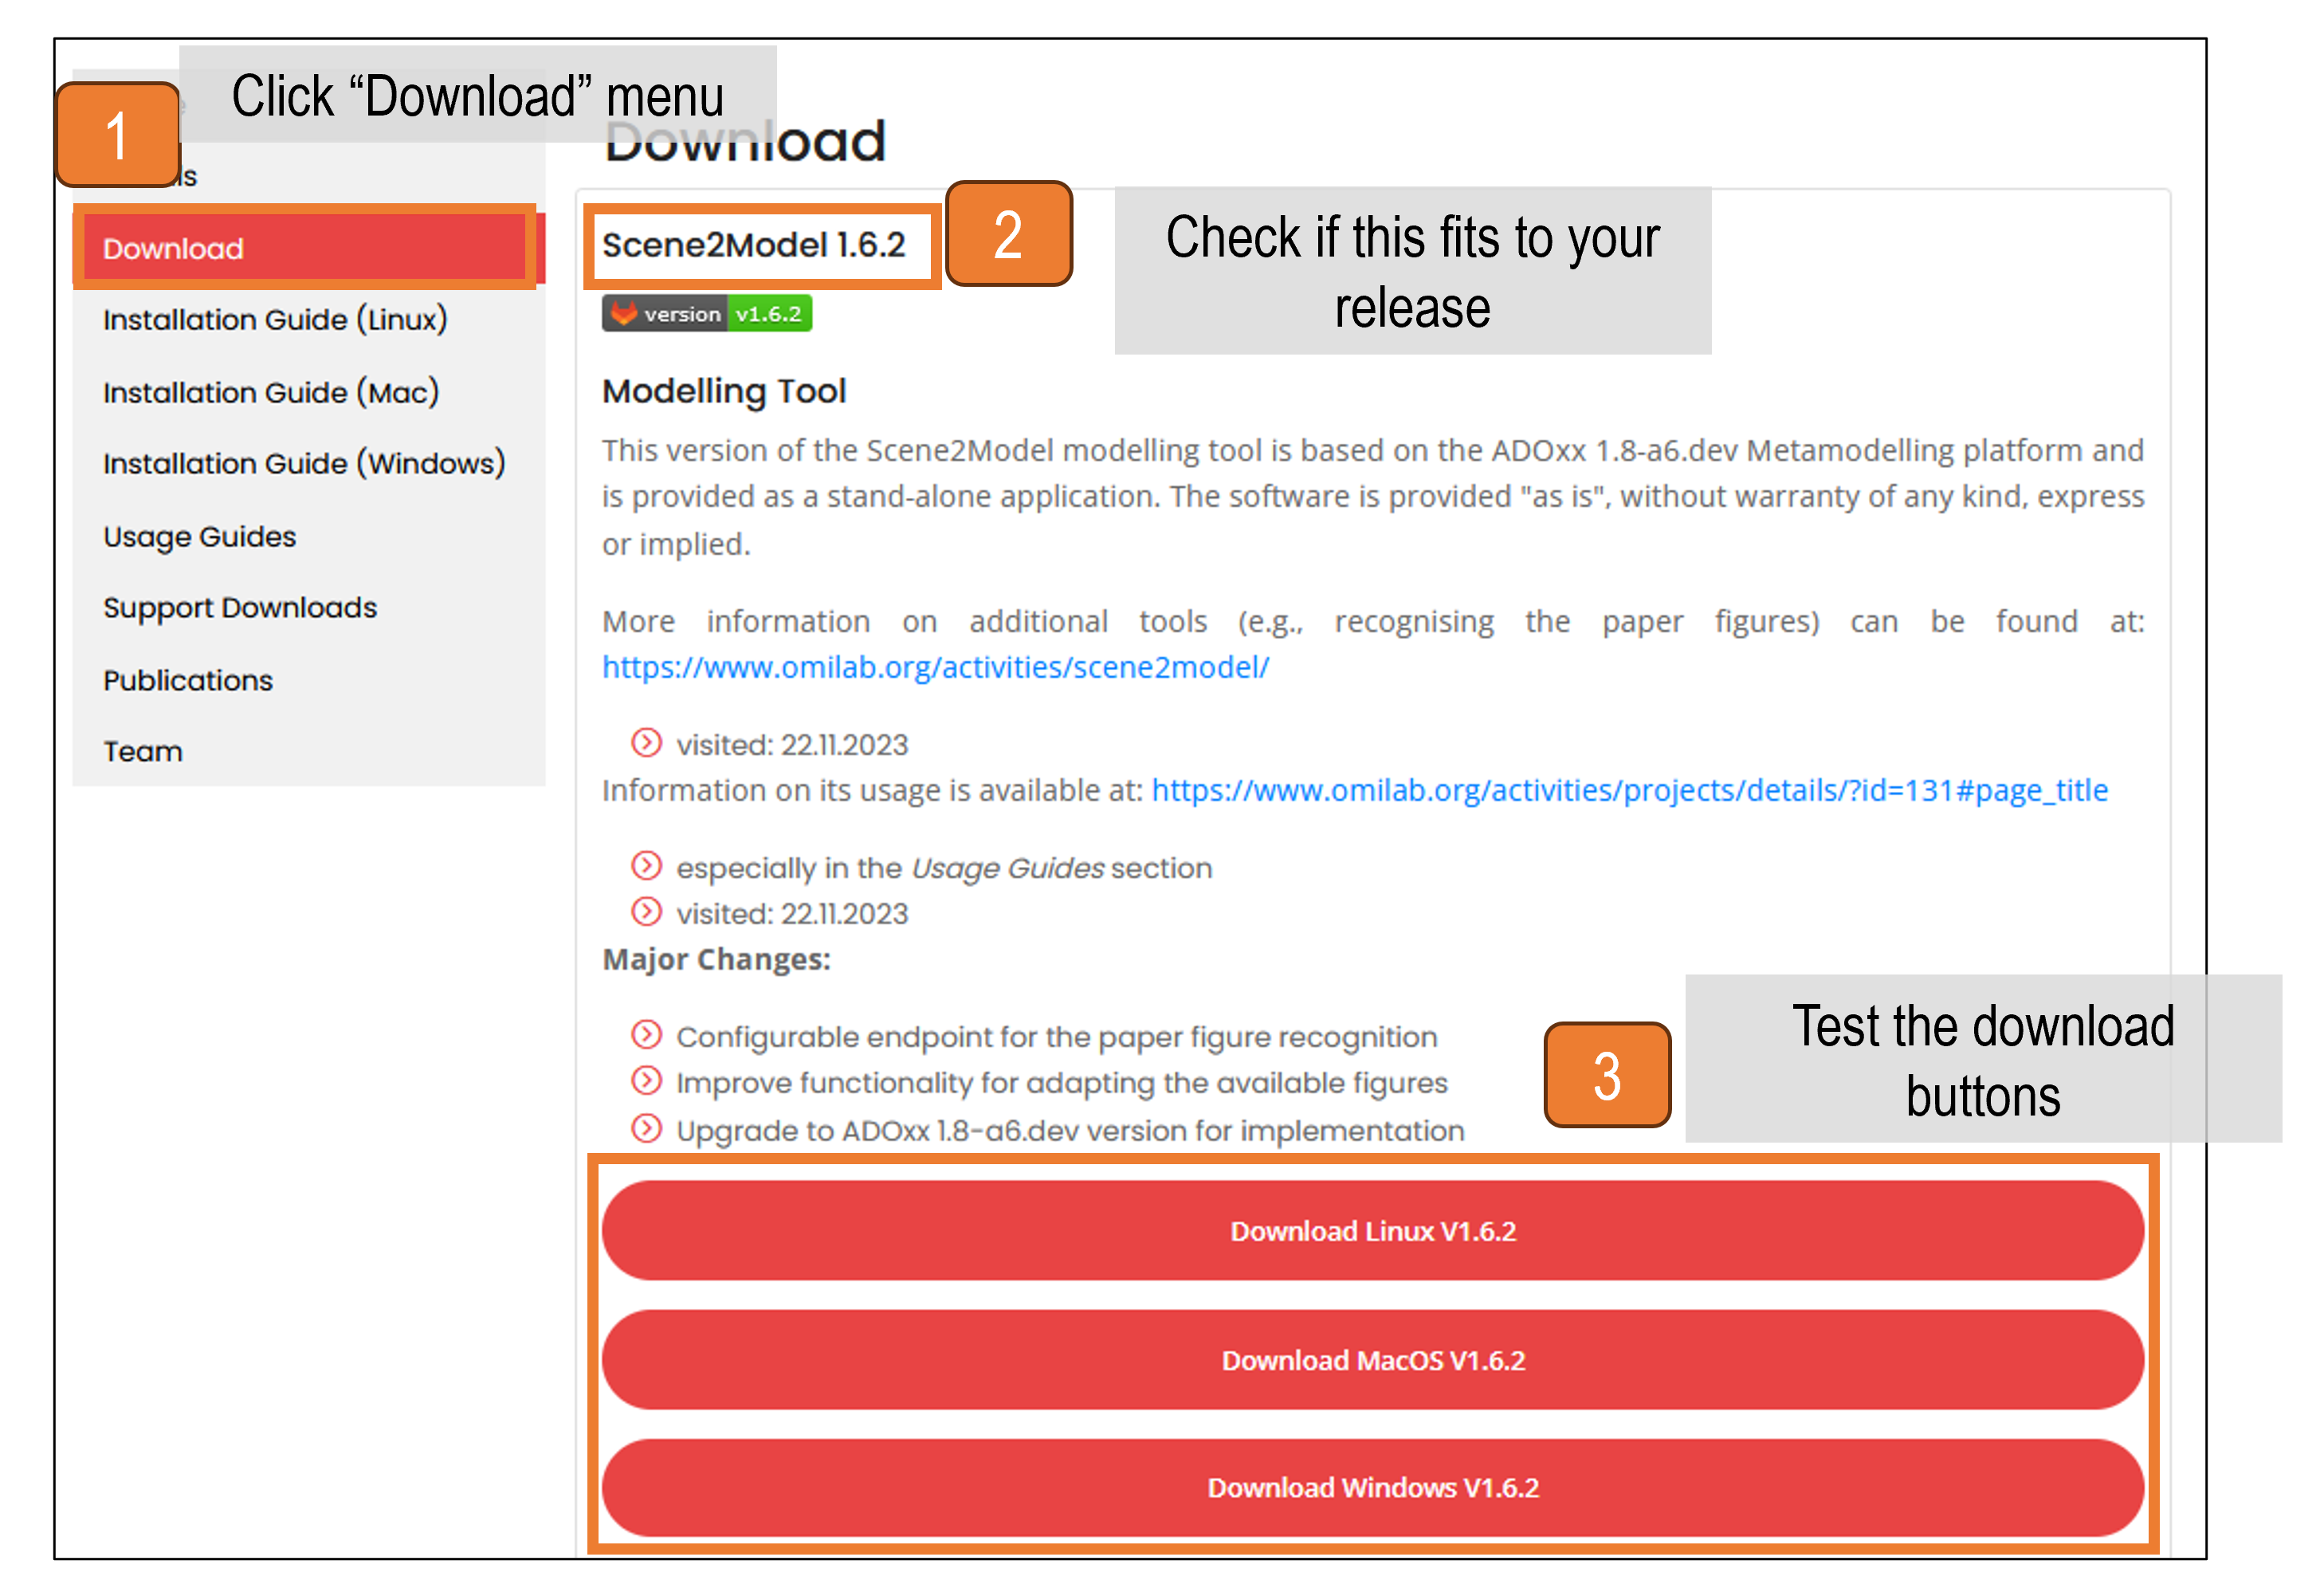 Example of a modelling tool download page
Publish your New Tool on the OMiLAB Community Tools Page
This section describes how you can publish your modelling tool, including download links on OMiLAB's community tools page.
Prerequisites:
- You have already packaged your modelling tool, as described here, including the installation files and the ADOxx library file (
.abl) for your modelling tool. - You have a name and logo for your modelling tool.
- You have a project in the
modelling_toolsgroup (https://code.omilab.org/resources/modelling_tools). - Your project in the
modelling_toolsgroup is set topublic
You should have a GitLab project containing the following folders (if not check again these steps):
- DOCUMENTATION (containing multiple folders with `` files)
- LIBRARY (containing your
.ablfile) - SRC
- TOOL (containing the installation files for your modelling tool)
Your modelling tool should already be visible on OMiLAB's community tool page.
The logo which is shown on the webpage, is the same which is provided as Project avatar for the GitLab project. To change it, follow these steps:
- Open your GitLab project
- Click
Settings - Click
General - Click
Choose file(underProject avatar). Search for your logo and confirm it - Click
Save changes
- Click
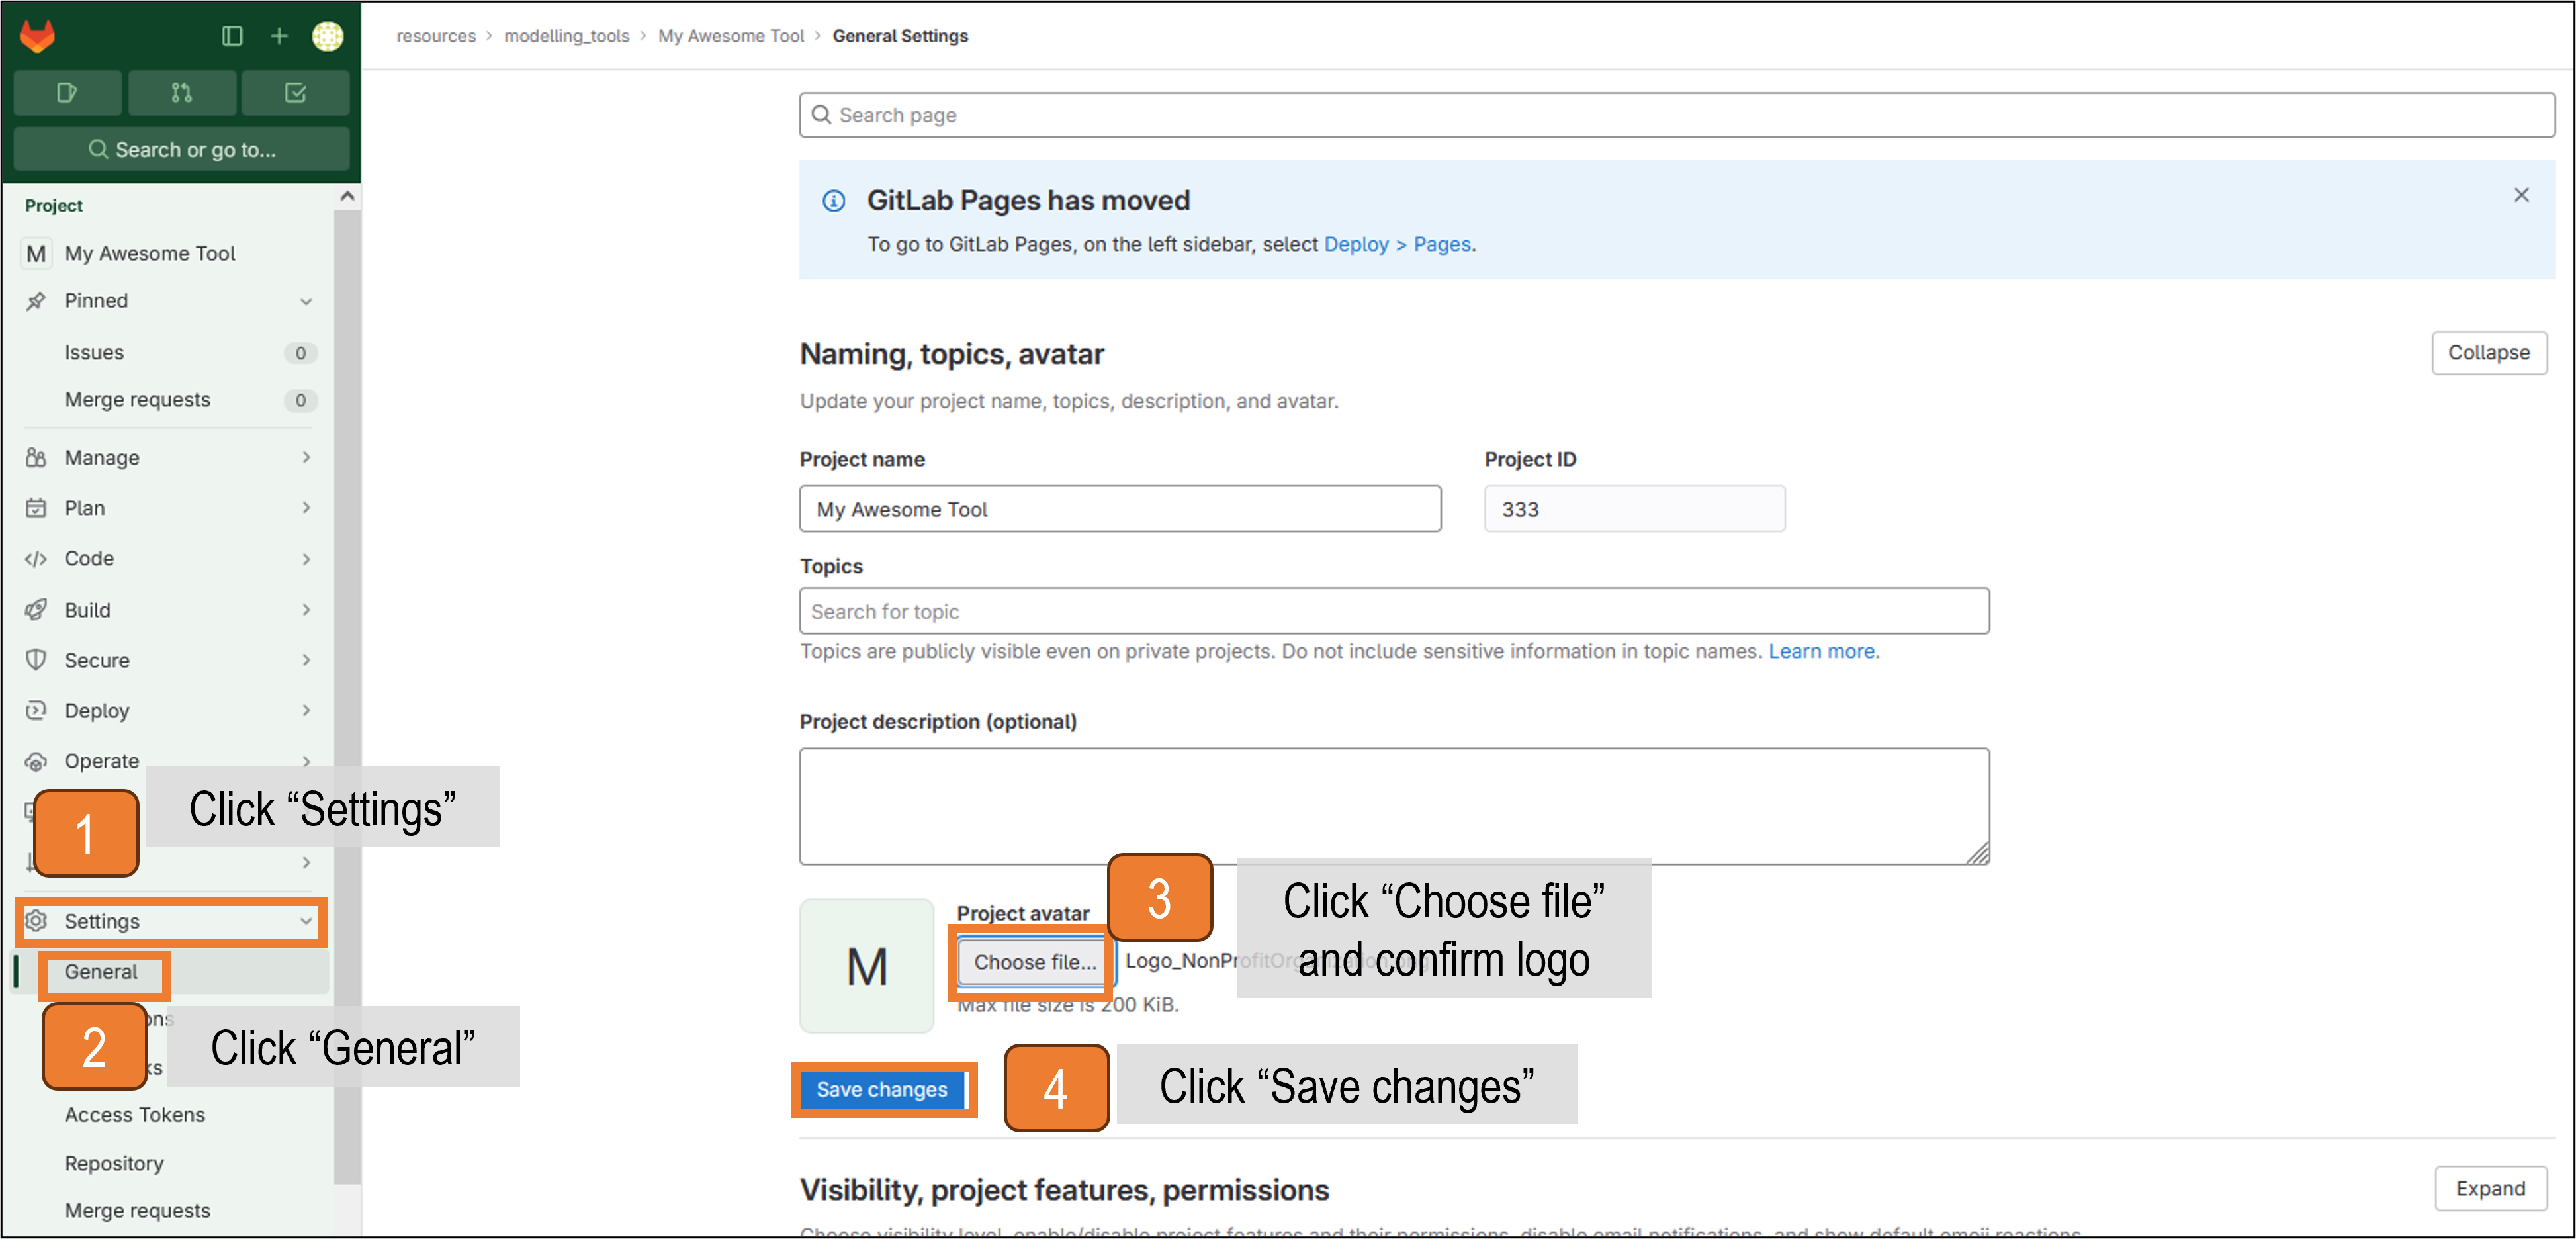 Upload the logo to your modelling tool project
The general approach of creating the webpage of the project on OMiLAB's community tools page, is that the provided files are parsed and the webpages are created out of them. Therefore, the content of the webpages is taken from the files and the meta information is provided in the headers of the files. For those familiar, this follows the Jekyll approach. The content of the webpages is formatted using Markdown. Therefore, the meta information is provided at the beginning of the file in between two lines of ---.
To provide all the necessary information, adapt the README file and all the `` files contained in the subfolders of DOCUMENTATION.
Open your local project in Visual Studio Code and when you are finished, push everything to the remote GitLab project (similar as in step 2 from the package procedure documentation).
Fill in the provided attributes in the meta information section and then provide the information in the body, an example for the README file can be seen in the figure below.
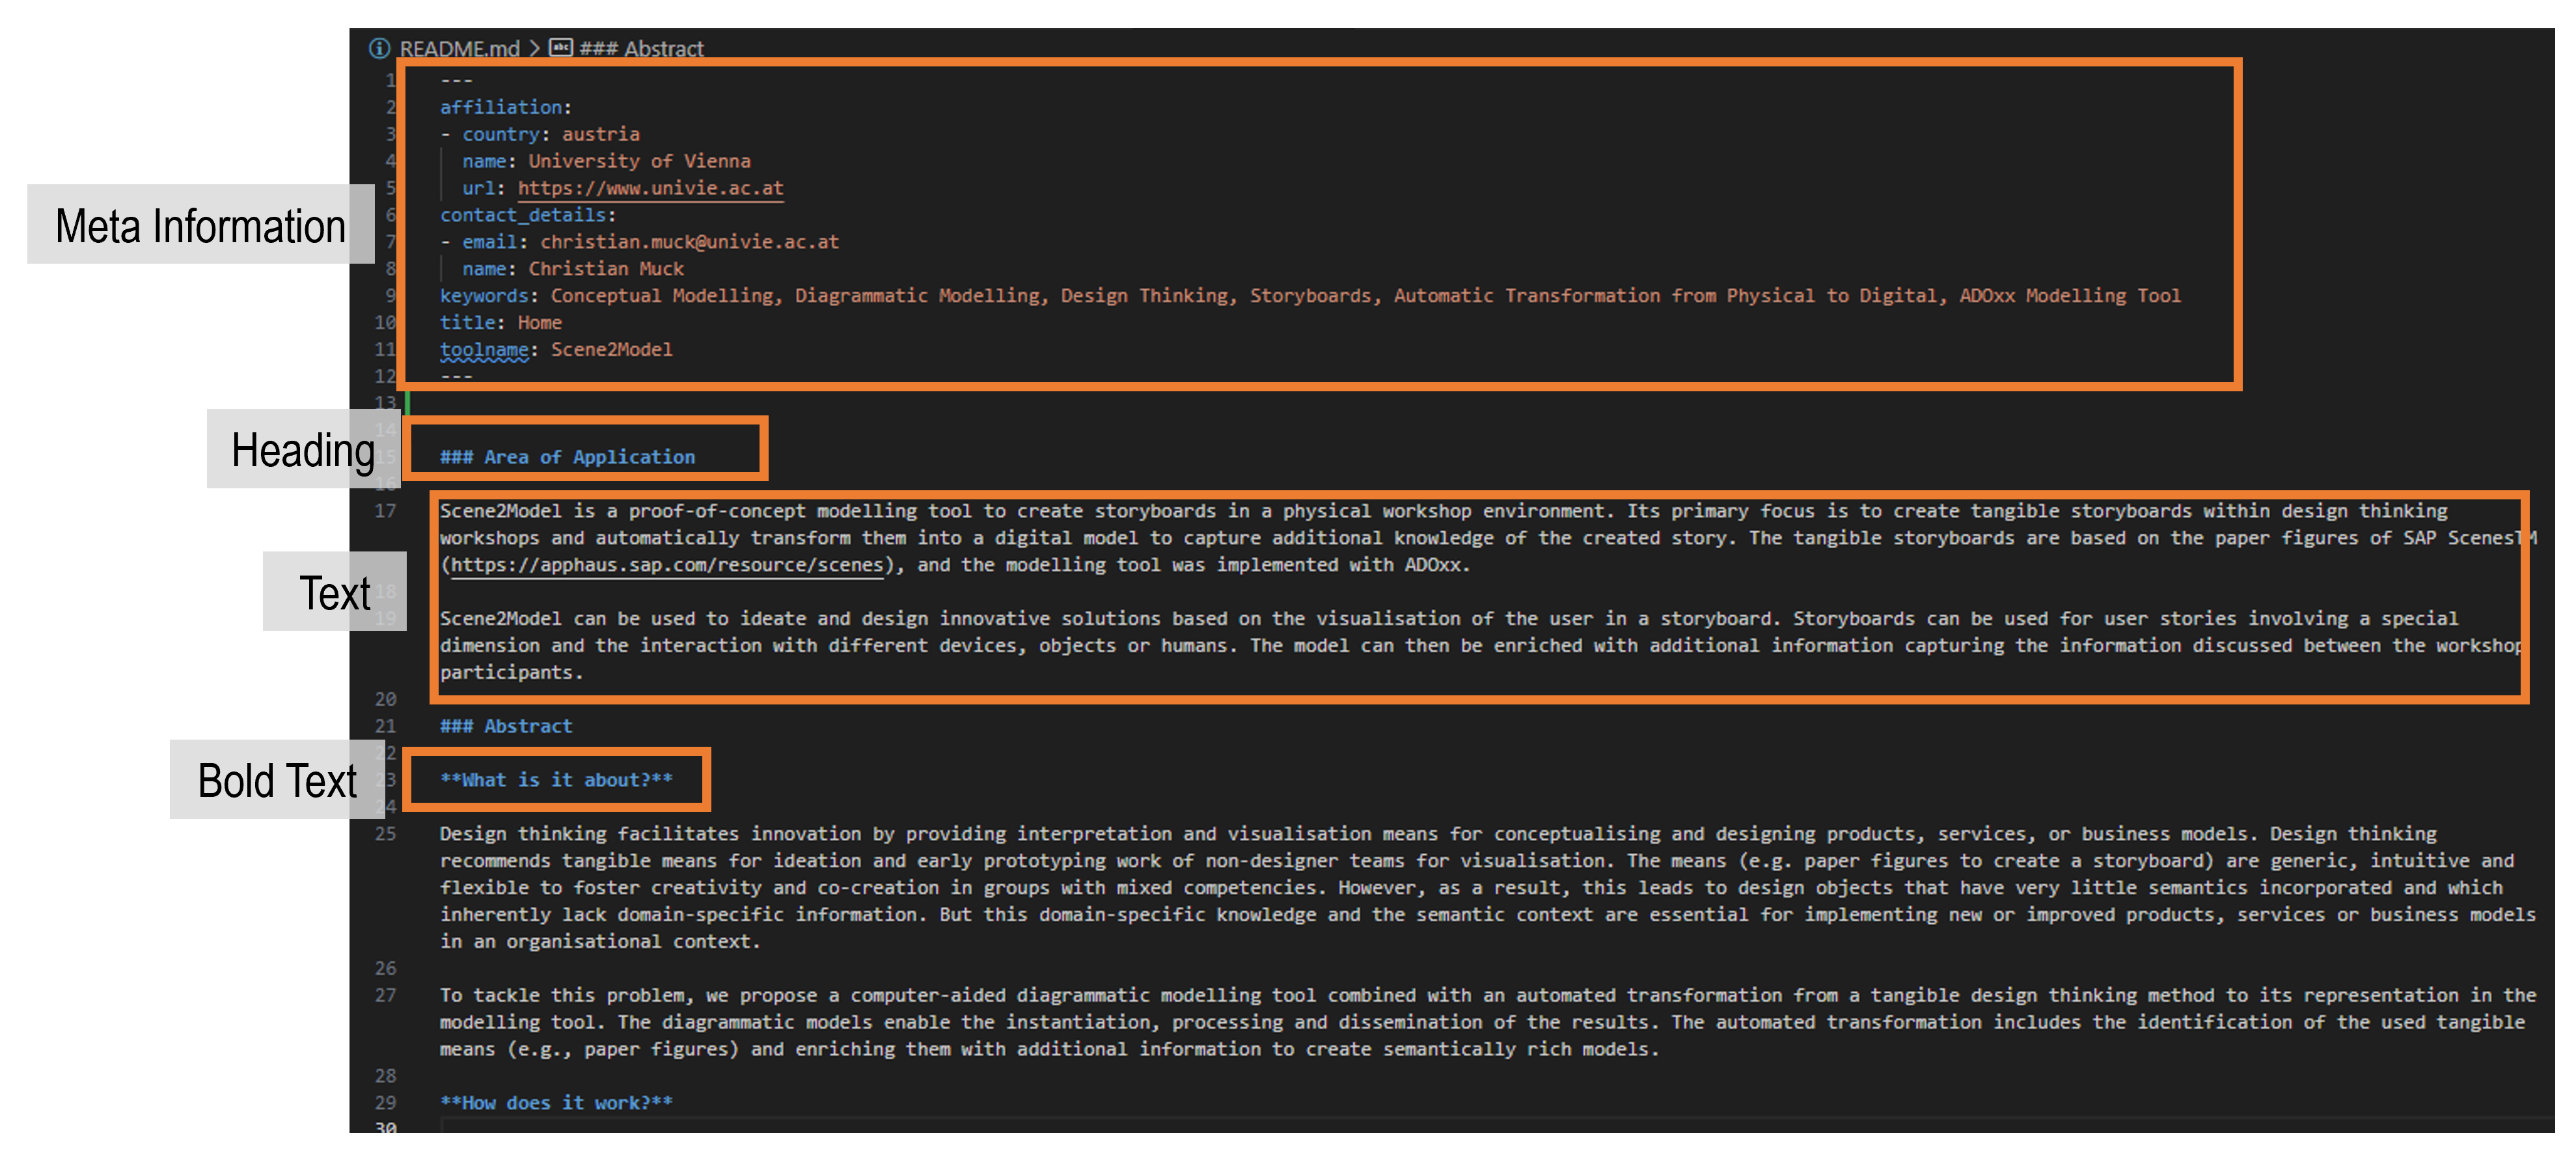 Example README file structure
Fill in the information in your README and also all the `` files in DOCUMENTATION sub folders. If you push the files to your GitLab project and reload the webpage of your project, the changes should be shown. If not, try it again after waiting some time or try to refresh with ctrl+shift+r.
After you have provided all the information, you have to create the download links of your modelling tool. Therefore, check if the TOOL and LIBRARY folder of your remote GitLab project are up-to-date and contain the version that should be published.
To make the installation files available for download on the project page, you have to make a new release of your tool, in the GitLab project:
- Open the GitLab project of your tool
- Click
Deploy - Click
Releases - Click
New release
- Click
 Create a new release for your modelling tool
- Provide a
Tag name, containing your version- Open the drop-down menu of the
Tag namefield
1a. In the search field type in the new name that you want to use
1b. Click onCreate tag \<your-tag-name\>
1c. Click onSave - Fill in the
Release title
2a. Fill in theRelease date
2b. Add a description of the release inRelease notes
2c. Add all the information fitting for your tool - Click
Create release
- Open the drop-down menu of the
 Fill out the information for the release
- Check if the download is available on the modelling tool page
- Open the webpage of your modelling tool
- Click on the
Downloadmenu - Check if your new release is shown
- Test the download packages
 Example of a modelling tool download page
Hint
If the release does not show up on the modelling tool download page, then check the settings of the GitLab project. Make sure that the visibility for Releases is set to "Everyone With Access". The option can be found in the project's Settings -> General -> Visibility, project features, permissions -> Releases on GitLab.